


Services on Demand
Article
 English (pdf)
 Article in xml format
 Article references
Indicators

Related links
-
 Cited by Google
 -
 Similars in Google
Share

 Permalink
Journal of the Southern African Institute of Mining and Metallurgy
On-line version ISSN 2411-9717
Print version ISSN 2225-6253
J. S. Afr. Inst. Min. Metall. vol.120 n.1 Johannesburg Jan. 2020
http://dx.doi.org/10.17159/2411-9717/860/2020
DEEP MINING PAPERS
The role of rock mass heterogeneity and buckling mechanisms in excavation performance in foliated ground at Westwood Mine, Quebec
L. BouzeranI; M. PierceII; P. AndrieuxIII; E. WilliamsIV
IItasca Consulting Group Inc. (ICG), United States
IIPierce Engineering, United States
IIIA2GC, Canada
IVCVM Consultants, Mississauga, Canada
SYNOPSIS
Operations at Westwood mine in Quebec, Canada were temporarily halted in May 2015 after three large-magnitude seismic events occurred over two days. The mechanisms leading to these events, which caused severe damage to several accesses, were not well understood at first. This is partly due to the complex geology at the site, where massive, unaltered, strong, brittle, and seismically active rock can alternate with highly altered, weak, foliated, and buckling-prone rock at the metre scale. Other aspects of ground behaviour, such as the significant discrepancy in blast-hole performance between secondary and primary stopes and the propagation of damage from stopes to haulage drives in some locations, were also not well understood. In 2017, further geotechnical characterization of the rock mass was carried out and numerical back-analyses of several locations were completed using the continuum code FLAC3D. The objectives of the back analyses were to better understand the mechanisms controlling rock mass performance and to obtain a calibrated model for predictive stoping simulations. This paper presents the key aspects of the modelling, which include (1) an anisotropic rock mass strength model with properties derived from field and laboratory strength testing, and (2) a scheme to account implicitly for the deconfinement that accompanies buckling around excavations.
Keywords: rock mass performance, anisotropy, back-analysis, FLAC3D, deconfinement, buckling.
Introduction
The Westwood mine is located approximately 80 km west of the town of Val-d'Or in Quebec, Canada. Operations at the mine were halted by three large-magnitude seismic events that occurred over two days in May 2015 (Kalenchuk, Mercer, and Williams, 2017). In addition to these events, which caused severe damage to several accesses, other aspects of ground behaviour, such as the significant discrepancy in the performance of blast-holes between secondary and primary stopes and the propagation of damage from stopes to haulage drives in some locations, were not well understood. In order to better understand the rock mass behaviour and its impact on the stability of excavations, additional geotechnical characterization of the rock mass was carried out and back-analyses of several locations were completed to calibrate a rock mass model to be used for forward analyses. The modelling work described in this paper was performed in three key steps.
> Defining an anisotropic rock mass model with the CaveHoek constitutive model (Pierce, 2013), with matrix and foliation properties derived from field (point load testing or 'PLT') and laboratory testing, and rock mass strengths derived from virtual testing of Ubiquituous Joint Rock Mass (UJRM) numerical specimens (Clark, 2006; Sainsbury, Pierce, and Ivars, 2008).
> Understanding the fundamentals of the buckling mechanism in buckling-prone rock at Westwood through discrete modelling using the distinct element code 3DEC (Itasca, 2016), representing foliation explicitly and using point load data directly to populate matrix and foliation properties at the drift scale. This allowed the implementation of a 'buckling scheme' in the continuum code FLAC3D (Itasca, 2017) to capture, in a continuum, the effect of the buckling observed in 3DEC in terms of deconfinement and stress redistribution at the drift scale (single drift and stacked drifts configuration).
> Simulating three case studies in FLAC3D involving performance at different scales (raise bore, drift, stope, multiple levels) to further refine the understanding and the modelling of the rock mass at Westwood.
Site description
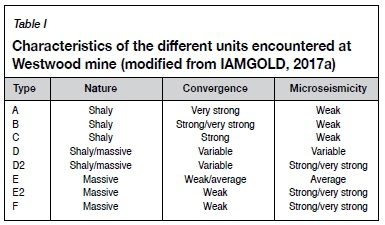
The Westwood mine is located on the Doyon property and on the 120 km line separating Rouyn-Noranda from Val-d'Or, on which are located a number of producing and past-producing mining projects such as Bousquet and LaRonde. Commercial production started in July 2014. The orebody consists of multiple veins (often close to one another) of narrow thickness (0.1 m to more than 10 m) and striking E-W, as is the foliation when present. The foliation typically dips at around 75 degrees. The geology is complex, with the presence of massive, unaltered, strong, brittle, and seismically active rock as well as highly altered, weak, foliated, buckling-prone rock as shown in Table I (IAMGOLD 2017a). A mixture of strong and weak rock can be encountered at the drift scale. The rock mass behaviour is time-dependent and exhibits a strong anisotropy due to the foliation. There is high horizontal stress that is likely oriented oblique to the orebody. Stopes are typically 30 m high and 13 m long. Depending on the constraints, both hangingwall or footwall access is employed and both primary/secondary sequences and pillarless sequences are used.
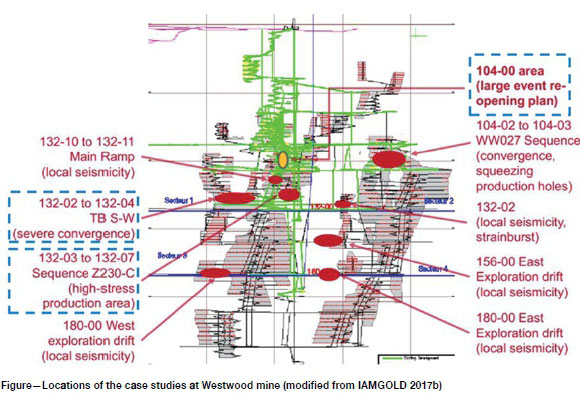
The locations selected for case study analysis are shown in Figure 1. These areas were back-analysed numerically in order to understand the rock mass behaviour and key mechanisms at play at Westwood and to calibrate the model to ensure they are captured correctly. Case study '104' refers to 'the 104-00 area and was selected as this portion of the ramp (colloquially referred to as the 'Coke Can') had experienced extensive damage prior to and after three large seismic events (far from any stoping activity) which led to severe damage and a temporary shutdown of the mine. Case study '132-03' refers to the 132-02 to 13204 TB S-W area and was selected due to significant damage (and high convergence) induced by stoping in crosscuts, which extended to the haulage accesses. Finally, case study '230' refers to the 132-03 to 132-10, Z230-C area and was selected due to intense hole squeezing problems and local microseismic activity in a particularly high-stress environment. It should be noted that a reduced version of the 104 case study used for calibration purposes, (mostly due to computation requirements) is presented here (referred to as the 'simple 104 model'). A large-scale 104 area model was built to analyse the three large seismic events but is not presented in this paper.
Rock mass representation
Characterization of matrix and foliation strength
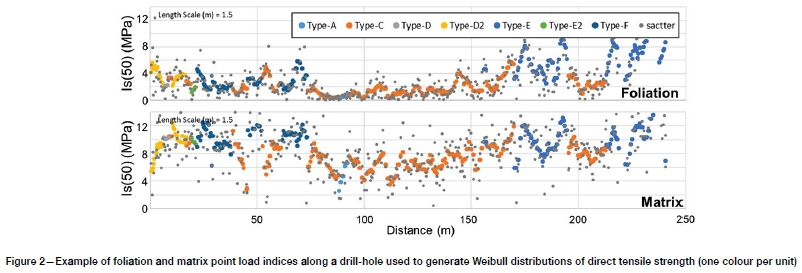
In order to better understand the variability in matrix and foliation properties within and across the different domains, a systematic point load test campaign was carried out on core from five new boreholes distributed along strike and depth. With boreholes oriented near perpendicular to foliation, it was possible to obtain a measure of the matrix strength from axial tests and foliation strengths from diametral tests (with foliation aligned appropriately with the testing direction as specified in the ISRM standard). A short 0.5 m spacing was employed between tests to obtain a highly detailed picture of foliation and matrix Is(50) variability by domain (see example in Figure 2). The point load indices were converted to uniaxial tensile strengths according to the ISRM standard (uniaxial tensile strength = Is(50)/0.8) and Weibull distributions generated fit to the matrix and foliation strengths by domain. The matrix point load indices were also correlated with UCS results from laboratory testing.
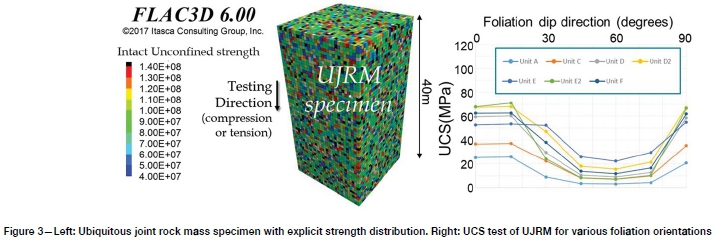
For each unit, the uniaxial tensile strength distributions derived from point load testing were used to populate matrix and foliation strengths at the zone level in large (40 m high) UJRM specimens of rock using FLAC3D. An example specimen is shown in Figure 3. A UJRM specimen can be assigned separate matrix and foliation strengths to obtain anisotropic mechanical behaviour and makes use of the CaveHoek constitutive model (Pierce, 2013) with embedded ubiquitous joints. The CaveHoek constitutive model is able to simulate the strain-softening behaviour and uses the Hoek-Brown envelope (Hoek, Carranza-Torres, and Corkum, 2002) for the peak and residual strengths. It also allows for representation of modulus softening, density adjustment, dilation, dilation shutoff, scaling of properties to zone size, cohesion weakening, tension weakening, and frictional strengthening. It has been adapted to account for anisotropy and buckling in the course of this work through the addition of ubiquitous joints (Clark, 2006; Board and Pierce, 2009) and an ad-hoc buckling scheme. The ubiquitous joint model is an option in the FLAC3D CaveHoek constitutive model that accounts for the presence of closely spaced planes of weakness. The criterion for failure on the plane, whose orientation is given, consists of a composite Mohr-Coulomb envelope with tension cut-off and brittle cohesion weakening.
Since the point load testing campaign only provides an estimate of uniaxial tensile strength, the corresponding cohesion had to be assumed. For the Westwood UJRM samples, the ratio between the foliation cohesion and tensile strength was assumed to be 2.5, based on experience. The friction angle was set at 25 degrees to account for the smooth, planar nature of the foliation surfaces. The Hoek-Brown m parameter for the matrix was assumed to be equal to the ratio between the matrix uniaxial compressive strength (from laboratory testing) and the matrix uniaxial tensile strength (from point load testing). The UJRM specimens are tested numerically in uniaxial compression to obtain an estimate of the large-scale strength of the rock mass according to test direction relative to the foliation. These emergent large-scale strengths are lower than the input matrix and foliation strengths since the lower end of the input strength distribution (the weaker zones) tends to control the failure of the sample. Figure 3 shows results of UCS tests performed on UJRM specimens of each geotechnical domain for different foliation orientations. The maximum strength is obtained when the test is performed perpendicular to the foliation and failure is controlled by matrix failure, while the minimum strength is reached when the test is performed between 45 and 60 degrees from the foliation direction and failure is controlled by shearing on the foliation. Table II gives the zone-scale (input) and large-scale (emergent) properties of UJRM specimens for matrix-controlled failure and foliation-controlled failure.
Calibration parameters
The large-scale rock mass strengths derived from UJRM testing were used in the numerical back-analysis of tunnel and stope performance. Some adjustments were generally required to achieve the best match to monitored performance. This calibration was completed mainly through the adjustment of the rock mass strength index (SI), which adjusts the peak strength of the rock mass compared to the large-scale emergent strengths from UJRM testing, and the rock mass brittleness index (BI), which controls the degree of brittleness of the matrix.
The degradation of the peak strength envelope is done in a similar fashion as when considering GSI to account for the presence of joints at large scale in a rock mass behaviour (Hoek, Carranza-Torres, and Corkum, 2002). Hence, the rock mass SI can vary from 0 to 100, where 100 corresponds to the large-scale emergent strengths from UJRM testing. The range for SI for the matrix typically used in this project for Westwood rock units and the different case studies is 95 to 100. The need to degrade the rock mass properties from UJRM testing to achieve a calibrated model can be attributed to several factors, including:
> The presence of medium-scale features not accounted for in the UJRM samples
> The variability of local rock mass strength and presence of weaker ground at the location of the case studies
> Bias in the selection of UCS samples (by selecting 'nice' samples), which would tend to overestimate the rock mass compressive strength.
The rock mass brittleness is adjusted through the critical strain parameter in the CaveHoek constitutive model. The critical strain is the critical plastic shear strain (epscrit) required to reach residual strength after the peak strength has been reached. If the critical strain is zero, the rock is perfectly brittle, i.e., it reaches residual strength as soon as it yields. If the critical strain is very large, the rock is very ductile, i.e., its strength decays very slowly from peak values after it starts yielding. The critical strain of a rock mass is an important parameter but is difficult to evaluate. At Westwood, the value of the critical strain has been calibrated through the variation of the brittleness index (BI). The critical strain is estimated as shown in Equation [1]. This type of estimation was first determined through a back-analysis by Lorig and Pierce (2000) of rock mass failure in caves and other openings as part of the International Caving Study, and provides a starting point. Thus, if BI = 100, the rock mass is perfectly brittle. If BI = 0, the rock mass is assigned a very large critical strain and essentially behaves in a perfectly plastic fashion. The presence of zone size (d) within this relationship recognizes that the critical strain is zone-size dependent in continuum models, where shearing tends to be resolved in a band approximately one zone thick. When using the CaveHoek constitutive model with ubiquituous joint functionality, the critical strain needs to be defined for the matrix and for the joints. In this project, 'joints' representing the foliation are considered perfectly brittle, which means that the critical strain is null, and so as soon as they reach the peak strength, their cohesion is downgraded to zero. The matrix strength, however, is considered less brittle, and the value of the index has been calibrated for each case study. The range for BI for the matrix typically used for Westwood rock units in this project is 80 to 92. This gives a critical strain of 1 to 2.5% for a 1 m zone.

The base case rock mass strength index is 100, which corresponds to the direct use of the large-scale rock mass strengths from UJRM testing. The base-case rock mass brittleness index is 80, which corresponds to a critical plastic shear strain for the matrix of 2.5%. Other base case parameters for each unit are listed in Table II.
Stress state
The in-situ stress measurements at Westwood are quite variable, both in terms of direction of the principal stresses and the ratio between principal stress magnitudes. Based on field measurements and early simulations of this project, it was decided to consider σ1 horizontal, oriented at 45 degrees east of north and equal to twice the vertical stress, and σ2 horizontal, oriented at 135 degrees east of north and equal to 1.65 times the vertical stress. This orientation of σ1 is considered an 'average' value of measured orientation (which mostly varies between 0 and 90 degrees) and corresponds to the predominant trend in the database (Blake, 2015). Recent field observations of seismicity around the stopes and drifts also agree with a major principal stress oriented NE-SW. The magnitude of the principal stress considers the high end of the measurements.
Buckling scheme
Site observations
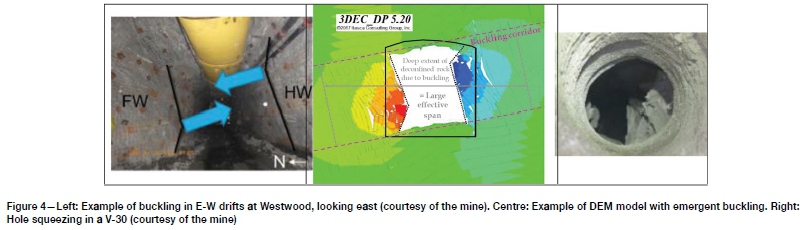
It can be observed on site (as shown in Figure 4) that drifts trending parallel to foliation strike in Unit C (prevalent in the footwall) experience deep sidewall buckling, which worsens over time (IAMGOLD, 2017b). Intensity varies greatly, and the resulting convergence rate can be as high as 0.6 m in two weeks. The same pattern is always observed: the top of the south wall and bottom of the north wall buckle in. Indeed, Unit C is one of the most highly altered units, with weak foliation plane strength and tight foliation spacing. In consequence, significant rehabilitation is required in long-term haulage accesses driven parallel to foliation. The effective span of drifts grows much larger than the initial mined span due to the presence of low confinement 'buckling corridors' (Mercier-Langevin and Hadjigeorgiou, 2011; Karampinos, 2016), as shown in Figure 4. At Westwood, the impact of buckling on the stability of openings trending in the E-W direction was significant in the area of case study 132-03. In this area, where mostly Unit C is present, haulage drifts are located in the hangingwall and parallel to foliation on multiple levels, with a 20 to 25 m offset from stoping activity. Significant closure of the haulage was experienced on level 132-03 and floor heave occurred on level 132-04, both attributed to buckling of the stope walls. In general, an improvement of access performance could be observed where the haulage drive deviated from the foliation direction. Buckling and consequent squeezing is also frequently observed at a smaller scale when excavating blast-holes and V-30s (i.e. raisebored slots) as shown in Figure 4. The impact of buckling on blast-hole performance has been studied in detail through case study 230.
Buckling scheme implementation
Squeezing conditions in hard rock mines have been studied by various authors, and a summary of recent work (Potvin and Hadjigeorgiou, 2008; Mercier-Langevin and Wilson, 2013) is given by Karampinos (2016). In particular, about squeezing in foliated rock: '[...] the stress redistribution around an opening results in loading of the intact rock in a parallel direction to the foliation planes. This leads in contraction along the foliation and dilation towards the opening. This dilation increases the deflection of the rock layers and decreases the critical buckling load. Bulking appears orthogonal to the foliation as the foliation planes open up. As buckling occurs in the sidewalls, this process is transferred deeper into the rock mass. The buckling process in the sidewalls results in an increased effective span, and reduces the confinement provided to the back and the floor as well as the friction between the foliation planes in these areas. At the early squeezing stages, there is a higher convergence rate in sidewalls whereas later in the process the closure rate reduces in the sidewalls and increases in the back.'
FLAC3D is not well suited to represent the buckling mechanism at Westwood because of its continuum formulation. To enhance buckling representation, an ad-hoc scheme has been added to the CaveHoek constitutive model used for the simulation. Regularly along the analysis, the stress normal to the foliation and the major stress in the plane of the foliation are calculated: if for a given zone, the stress normal to the foliation is below a certain threshold, and if for this same zone the major compression stress in the foliation plane is above a certain threshold, this zone is considered to have buckled. If buckled, the zone's stress tensor is reinitialized to zero and residual properties are applied to this zone. This scheme allows reproduction of the consequences of the buckling in terms of deconfinement and stress redistribution around an opening. However, buckling is not explicitly modelled, so the large magnitude of associated buckling deformations is not simulated accurately. The buckling scheme implementation has been done in two steps:
1. Calibrate buckling thresholds (normal and in-plane foliation stress) at the drift scale, looking at one drift (with comparison with the equivalent 3DEC model for which buckling is emergent) and multiple stacked drifts
2. Study and ensure that the scheme is able to reproduce the main aspects of case studies 104 (large effective span of excavations), 132 (impact of stoping on crosscuts and haulage accesses), and 230 (squeezing of blast-holes in primaries and not in secondaries) with limited calibration of parameters.
Single and stacked drift behaviour
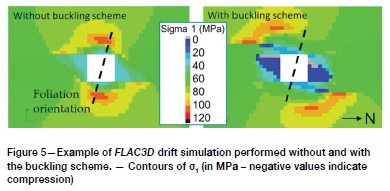
A drift-scale model (5 m span at 1200 m depth) was first implemented to test the model assumptions and buckling scheme, and ensure that drift behaviour was aligned with site observations. As can be seen in Figure 5, the buckling scheme is critical to achieve deep deconfinement of the drift walls as expected in a buckling-prone rock. Site observations also indicate that buckling could be observed about 4 m deep into the wall at crosscuts, which is aligned with the model deconfinement depth. Also, comparison between the FLAC3D model and the 3DEC model (from which buckling is emergent) gives similar results in terms of stress redistribution, as shown in Figure 6.

When rock mass properties are varied from the base case assumptions, results in terms of stress redistribution are not significantly variable (i.e., deconfinement up to approx. one span on each side). This suggests a geometric effect of the joints, which is also observed in 3DEC. The following buckling stress thresholds, for a given zone, seem to give reasonable results: stress normal to the foliation below 2 MPa and for this same zone, compression stress in the foliation plane above 20 MPa. Increasing the normal stress threshold and decreasing the compression stress threshold makes the rock mass more susceptible to buckling (and hence deepens the deconfinement zone), but the model is not highly sensitive to these thresholds at the drift scale. After the drift-scale model was calibrated and gave reasonable results, a model of three stacked drifts (5 m span at 1200 m depth) was simulated. The distance between levels was about 15 m, which is similar to the 'Coke Can' configuration in the 104 area where significant stability issues have been encountered. Comparison between the FLAC3D and the 3DEC models (from which buckling is emergent) gave similar results (see Figure 6) in terms of stress redistribution and, as expected, due to the large effective span, stress is concentrated between levels (σ1 > 120 MPa). The deconfinement in the roof and floor of the 3DEC model of the stacked drifts seems unrealistic and is due to properties of the matrix used in the 3DEC model (likely too weak). Properties were readjusted for the single drift model, but this stacked drift model was not rerun due to time constraints.
Back-analysis
104 area (simplified model)
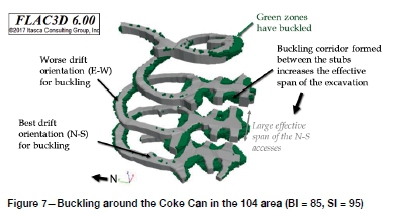
After the drift-scale models were studied, a simple model of the 104 area was simulated. This model is in the vicinity of the so-called 'Coke Can', which is a cylindrical volume of ground located in a section of the ramp and adjacent to the N-S access of the 104 area between levels 104-06 and 104-10. In this area, the extraction ratio was high due to the tight level spacing (< 15 m) and extensive excavation of sub-levels perpendicular to the main N-S ramp accesses (Figure 7). This model aimed to reproduce the buckling in the walls of the accesses that led to the increase of the effective span and the yielding of the core of the accesses on levels 104-06 to 104-10. The subsequent seismic events and further yielding (IAMGOLD, 2015) were not studied as part of the calibration process presented in this paper. Figure 7 shows the geometry of the model and zones that have buckled for one of the tested cases. As expected, excavations oriented E-W exhibit buckling of the walls because the foliation is dipping south. South of the ramp, where E-W sub-drifts are closely spaced, the buckled volumes tend to connect and generate a large overall effective span, much larger than the original span of the N-S access. This behaviour is critical to explain the yielding of this volume of ground at Westwood which led to large seismic events.
Case study 132-03
Case study 132-03 focused on an area of block 226A where significant convergence was observed in the crosscuts and haulage access on multiple levels adjacent to stoping. This level of damage was surprising given the standoff distance from stoping (30 m on 132-02, 25 to 30 m on 132-03). This area is in Unit C only (which is prone to buckling). Figure 8 shows the results of damage mapping in the area of interest on level 132-03. The damage was induced by the mining of two stopes between levels 132-02 and 132-03. Figure 8 also shows the geometry of the area of interest modelled in FLAC3D. Figure 9 shows σ1 and σ3 after excavation on transverse sections through the two stopes. Because of the deep buckling and associated deconfinement occurring in the walls of the stopes, the crosscut on level 132-03 is completely yielded and the volume of rock between levels 132-04 and 132-03 is experiencing elevated σ1 (70 to 100 MPa) and low confinement (< 25 MPa). This can explain why the haulage on level 132-04 was impacted by stoping and experienced floor heave.
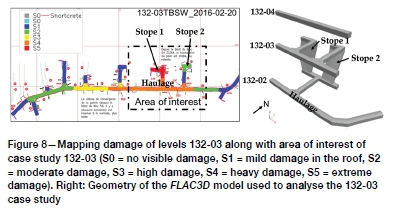
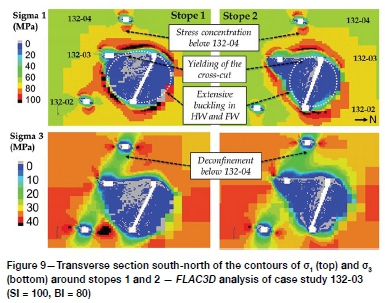
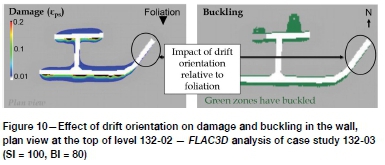
Figure 10 shows a transverse section close to the roof of the haulage of level 132-02. It can be seen that the damage (left-hand plot) at the top of the south wall in the E-W drift is almost absent in the section of the drift oriented NE-SW. This is due to the absence of buckling (right-hand plot) in NE-SW drifts for which the stress on the foliation is not high enough to induce significant buckling in the walls. These results are in accordance with observation throughout the mine that drifts oriented at least 30 degrees from the E-W direction tend to perform much better than E-W drifts, as shown by the damage mapping in Figure 8. All these results have been obtained with the base case properties, a strength index SI = 100, and a brittleness index BI = 80. Hence, by using directly the point load data to derive the strength of the rock mass through UJRM testing (without further degradation) and the buckling scheme, the following aspects of the 132-03 case study could be captured:
1. The stope wall instability due to deep buckling
2. The depth and severity of drift closure and buckling depth in E-W drift (pre-stoping)
3. The beneficial effects of re-orienting drifts from the E-W direction
4. The negative impacts of stoping on the drifts in terms of stress concentration and deconfinement, especially on the 132-03 level.
Case study 230
Case study 230 focuses on the sequence Z230C, where high stress conditions were observed. This case study was chosen for two specific behaviours: (1) significant blast-hole squeezing in primaries (purple stopes in Figure 11) but not in secondaries (yellow stopes in Figure 11), and (2) high level of microseismicity in the hangingwall of the upper level when mining the secondaries.
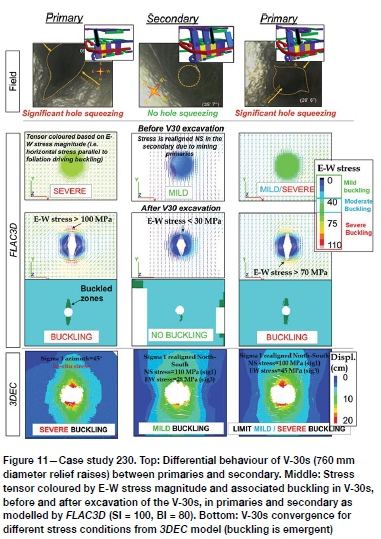
Only three stopes of the Z230C sequence were modelled as part of the case study: two primaries and one secondary (indicated by arrows in Figure 11). The hole squeezing aspect of this case study was studied by explicitly modelling the stopes and V-30s and excavating them in sequence. Figure 11 shows the stress tensors at the location of the V-30s, just prior to their excavation, for each of the stopes modelled (two primaries and one secondary). The stress tensors are coloured based on the magnitude of the E-W stress, the horizontal stress that is parallel to the foliation and is responsible for driving buckling. The model successfully demonstrated significantly more buckling in primaries than secondaries. Indeed, it can be seen that the E-W stress is quite high in primaries and leads to moderate to severe buckling, while the E-W stress is very low in secondaries (since it is shielded by primaries located on the east and west sides of the secondary) and hence no significant buckling is observed. These observations indicate that high E-W (foliation-parallel) stress leads to blast-hole closure (in primaries), and not high induced N-S pillar stresses (in secondaries). This explains why secondaries (shielded from E-W stresses by primaries) experience less hole squeezing than primaries. Also, approximate threshold levels of E-W stress (prior to drilling) for hole squeezing were defined from the FLAC3D model: mild squeezing is expected for an E-W stress of 20 to 30 MPa, moderate squeezing for an E-W stress of 30-45 MPa, and severe squeezing is expected for an E-W stress above 45 MPa. These thresholds were validated by the 3DEC simulations of the excavation of V-30s under different stress conditions; these results are shown in Figure 11 as well. The seismic aspect of this case study was unsuccessful; the location of the 'seismic-prone' rock in the model (hangingwall and footwall at stope level) based on stress evaluation did not match the location of seismicity (hangingwall of the second level). This may be due to an inaccurate representation of the local units or local properties of the units that localized the seismicity into specific areas.
Conclusion
We are able to simulate rock mass performance at Westwood only if all of the following aspects are included in the model:
1. Use of PLT and laboratory data as input to UJRM tests to estimate excavation-scale anisotropic rock mass strength, with minimal additional downgrading in the subsequent calibration process (equivalent to SI 98 to 100)
2. Brittle rock mass matrix and foliation response
3. Incorporation of a scheme to account for the deconfinement that accompanies buckling around excavations (buckling represented implicitly within the model with destressing and weakening driven by high foliation-parallel stress coupled with low normal stress).
The incorporation of these aspects of behaviour into the rock mass numerical behaviour has allowed for a successful match to rock mass performance in case studies 132-03 and 230, with demonstrated ability to capture drift closure, hole squeezing, stope wall instability, and the impact of the drift's orientation; and a successful simulation of large-scale ground yielding in the presence of tightly spaced accesses under high local extraction ratio in the 104 area (the 'Coke Can'), with buckling being the essential mechanism to increase the effective span of the NS accesses and push stresses out to the rock mass beside and below. To refine the rock mass model behaviour for future work, the buckling scheme could be refined by making destressing dependent on the stress level instead of zeroing the stress in the buckled zone, and the rock strength distribution could be explicitly embedded in the large-scale simulations, similarly to what was done for the UCS tests of the UJRM.
Acknowledgements
Itasca acknowledges and thanks IAMGOLD and the Westwood geotechnical team (Emilie Williams, Patrick Ferland, Hugo Fisette, Maxim Martel, Jean-Francois Dupuis, and Daniel Vallières) for providing insights into the mine's ground behaviour in addition to qualitative input data, as well the authorization to publish this work. Itasca also acknowledges Patrick Andrieux for facilitating our participation in this project. Thanks to Rob Mercer and the external review board (John Hadjigeorgiou, Peter Kaiser, and Brad Simser) which helped guide this work and brought useful ideas and comments. The authors also wish to acknowledge Thierry Lavoie for contributing to aspects of this work.
References
Blake, W., Kaiser, P.K., and Simser, B. 2015. Rockburst Review Committee Report, Supplementary Technical Report, Submitted October 5 2015. Westwood Mine, IAMGOLD. [ Links ]
Board, M. and Pierce, M. 2009. A review of recent experience in modelling of caving. Proceedings of the International Workshop on Numerical Modeling for Underground Mine Excavation Design and 43rd US Rock Mechanics Symposium. NIOSH Pittsburgh Research Laboratory, Pittsburgh, PA. [ Links ]
Clark, I.H. 2006. Simulation of rockmass strength using ubiquitous joints. Proceedings of the 4th International Symposium on Numerical Modeling in Geomechanics, Madrid, Spain, 29-31 May. Hart R. and Varona, P. (eds). Itasca Consulting Group, Minneapolis, MN. Paper no. 08-07. [ Links ]
Hoek, E., Carranza-Torres, C., and Corkum, B. 2002 Hoek-Brown failure criterion - 2002 edition. NARMS-TAC2002: Mining and Tunnelling Innovation and Opportunity, vol. 1, pp. 267-273. Hammah, R., Bawden, W., Curran, J., and Telesnicki, M. (eds). University of Toronto Press. [ Links ]
IAMGOLD. 2017a. Mineralization and geology of the Westwood deposit. PowerPoint presentation for internal communication, 56 slides. January 2017. [ Links ]
IAMGOLD. 2017b. Westwood background presentation. PowerPoint presentation for internal communication, 101 slides. January 2017. [ Links ]
IAMGOLD. 2015. Analysis of May 26th seismic events and general seismicity at Westwood mine. - PowerPoint presentation, peer review 25-26 September 2015, 162 slides. September 2015. [ Links ]
Itasca Consulting Group Inc. 2017. FLAC3D - fast Lagrangian analysis of continua in 3 dimensions, version 6.0. Minneapolis, MN. [ Links ]
Itasca Consulting Group Inc. 2016. 3DEC - three-dimensional distinct element code, version 5.2. Minneapolis, MN. [ Links ]
ISRM. 1984. Suggested method for determining point load strength. ISRM: Point load test, RTH 325-89, 10 June 1984. http://www.geoplanning.it/test/wp-content/uploads/2012/02/Suggest-method-for-determining-Point-Load-Strength.pdf [ Links ]
Kalenchuk, K.S., Mercer, R., and Williams, E. 2017. Large-magnitude seismicity at the Westwood mine, Quebec, Canada. Proceedings of the Eighth International Conference on Deep and High Stress Mining. Wesseloo J. (ed.). Australian Centre for Geomechanics, Perth. pp. 89-101. [ Links ]
Karampinos, E. 2016. Management of squeezing ground conditions in hard rock mines. PhD thesis, Department of Civil Engineering, University of Toronto. [ Links ]
Lorig, L. and Pierce, M. 2000. Methodology and guidelines for numerical modelling of undercut and extraction level behaviour in caving mines. Report to the International Caving Study. Itasca Consulting Group, Minneapolis, MN. [ Links ]
Mercier-Langevin, F. and Hadjigeorgiou, J. 2011. Towards a better understanding of squeezing potential in hard rock mines. Mining Technology, vol. 120, no. 1. pp. 36-44. [ Links ]
Mercier-Langevin, F. and Wilson, D. 2013. Lapa Mine - ground control practices in extreme squeezing ground. Proceedings of the Seventh International Symposium on Ground Support in Mining and Underground Construction. Potvin Y. and Brady B. (eds). Australian Centre for Geomechanics, Perth. pp.119-131. [ Links ]
Pierce, M. 2013. Numerical modeling of rock mass weakening, bulking and softening associated with cave mining. ARMA e-newsletter. ARMA Publications Committee, Spring 2013. [ Links ]
Potvin, Y. and Hadjigeorgiou, J. 2008. Ground support strategies to control large deformations in mining excavations. Journal of the Southern African Institute of Mining and Metallurgy, vol. 108, no. 7. pp. 397-404. [ Links ]
Sainsbury, B-A, Pierce, M, and Ivars, D.M. 2008. Simulation of rock mass strength anisotropy and scale effects using a ubiquitous joint rock mass (UJRM) model. Proceedings of the First International FLAC/DEM Symposium on Numerical Modeling, (Continuum and Distinct Element Numerical Modeling in Geo-Engineering). Hart, R., Detournay, C., and Cundall, P. (ed.). Itasca Consulting Group, Minneapolis, MN. Paper 06-02. [ Links ] ♦
 Correspondence:
L. Bouzeran
lbouzeran@itascacg.com
Received: 31 Jul. 2019
Accepted: 3 Oct. 2019
Published: January 2020

