


Servicios Personalizados
Articulo
 Inglés (pdf)
 Articulo en XML
 Referencias del artículo
Indicadores

Links relacionados
-
 Citado por Google
 -
 Similares en Google
Compartir

 Permalink
Historia
versión On-line ISSN 2309-8392
versión impresa ISSN 0018-229X
Historia vol.63 no.2 Durban 2018
http://dx.doi.org/10.17159/2309-8392/2018/v63n2a6
ARTICLES
The "apostles of terror": South Africa, the East African campaign, and the Battle of El Wak
Evert Kleynhans*
Doctoral candidate in the Department of Military History, Faculty of Military Science, Stellenbosch University
ABSTRACT
Shortly after the outbreak of the Second World War, the Union Defence Force (UDF) had to undergo a rapid transformation from an ageing defence force to one that could project offensive power across Africa. The formation of the 1st South African Division (1st SA Div) during 1940, and the subsequent deployment of South African troops to the East African theatre, afforded the UDF the opportunity to test its military capabilities under operational conditions against the Italian threat in Ethiopia (then Abyssinia) and Somalia (then Italian Somaliland). It had been 21 years since the Union of South Africa was last in a state of war, and the UDF's first battle in East Africa is a prime tool by which to measure concepts such as force design, military innovation and the operational employment of forces, to name but a few. The Battle of El Wak was not only the UDF's initial battle in the East African campaign, but also South Africa's first battle during the Second World War. By drawing from primary archival material and secondary sources, the article concludes that the Battle of El Wak had a definite impact on the entire South African campaign in East Africa.
Keywords: Second World War; East Africa; Union Defence Force; 1st South African Division; George Brink; El Wak.
OPSOMMING
Kort na die aanvang van die Tweede Wêreldoorlog moes die Unieverdedigingsmag (UVM) vinnig transformeer vanaf 'n verouderde verdedigingsmag, na een wat offensiewe mag kon projekteer regoor Afrika. Die totstandkoming van die 1ste Suid-Afrikaanse Divisie (1ste SA Div) gedurende 1940, en die daarop volgende ontplooiing van Suid-Afrikaanse troepe na die front in Oos-Afrika, het aan die UVM die geleentheid gebied om sy militêre bekwaamheid onder operasionele omstandighede te toets teen die Italiaanse bedreiging in Ethiopië (toe Abessinië) en Somalië (toe Italiaanse Somaliland). Dit was reeds 21 jaar sedert die Unie van Suid-Afrika in 'n toestand van oorlog verkeer het, en dus is die UVM se eerste veldslag in Oos-Afrika 'n nuttige instrument om konsepte soos magstruktuur, militêre innovering en die operasionele ontplooiing van gevegsmagte mee te bestudeer. Die slag van El Wak was nie net die UVM se eerste veldslag in die Oos-Afrika veldtog nie, maar ook Suid-Afrika se eerste veldslag gedurende die WW2. Deur gebruik te maak van primêre argivale bronne, en aangevul deur sekondêre bronne, bevind die artikel dat die slag van El Wak 'n beduidende impak op die algehele Suid-Afrikaanse veldtog in Oos-Afrika gehad het.
Sleutelwoorde: Tweede Wêreldoorlog; Oos-Afrika; Unieverdedigingsmag; 1ste Suid-Afrikaanse Divisie; George Brink; El Wak.
Introduction
The deployment of the 1st SA Div to East Africa during the Second World War has been the subject of a number of academic and popular historical publications. Some of the more general works that cover the South African deployment to East Africa provide a rare, in-depth narrative on the campaign. The first of these appeared as early as 1941, and many were overtly propagandistic, published specifically to bolster wartime morale. These works include Springbok Victory;1 Vanguard of Victory: A Short Review of the South African Victories in East Africa 1940-1941;2 It's a Long Way to Addis;3 South Africa Fights;4and Pienaar of Alamein: The Life Story of a Great South African Soldier5These publications naturally add to the discussion on the South African offensive operations in East Africa. In 1960, Avenge Tobruk was published.6 The author, Eric Hartshorn, the officer commanding of the Transvaal Scottish during the campaign, offers a unique, but at times rather colourful, and highly doubtful perspective on the South African deployment. The focus of the work is, however, only on the First South African Brigade (1st SA Bde) and its operational employment throughout the campaign as part of the 11th and 12thAfrican Divisions. The next book on this war appeared in 1965 and was Harry Klein's Springboks in Armour: The South African Armoured Cars in World War II,7which addresses the South African deployment of armour during the campaign. Klein, however, gives scant attention to historical objectivity in his analysis of the successes and failures of the South African armour operations.
An official history of the South African deployment to East Africa during the Second World War, although planned, has never materialised.8 Sadly, the Union War Histories Section, tasked with undertaking the project, was closed down permanently in 1961 after the appearance of only three publications.9 One agrees with military historian David Katz, who suggests that the nadir of this important task was ushered in when the Afrikaner-oriented National Party assumed power in 1948.10 From 1961 recording of South Africa's WWII effort remained somewhat haphazard, with the government, the citizen force and the ex-servicemen's associations all at some stage undertaking projects aimed at resuscitating the memories of South Africa's participation in the war. This led to the publication of a number of historiographical works, some of which were of dubious quality and hagiographic in outlook.
An advisory committee was set up to ensure that the programme for publications on military history would continue to function, but the semi-official histories emanating from this endeavour clearly lack original research and they rely far too heavily on the unpublished manuscripts compiled by the Union War Histories Section. As such, they add little to the general body of knowledge on South African participation in the war.11 The first volume of the "South African Forces in World War II" series appeared in 1968, under the title of East African and Abyssinian Campaigns.12Though essentially a campaign history, Neil Orpen's work, rather alarmingly, is the most complete publication to have appeared on the South African operations in East Africa. Unfortunately, the book fails to place the South African operations during the campaign into strategic context, especially against the backdrop of the larger Allied offensive operations in the theatre. It remains a rather warped and one-sided version of the campaign.
In 1979, Neil Orpen and Henry Martin published South Africa at War13as a part of the same series. This book explains some aspects of the South African home front during the war, including the logistical, administrative and industrial efforts undertaken by the Union government to supply the Allied Forces in East Africa with much-needed war materiel. By 1981 Orpen and Martin produced the first volume of Salute the Sappers,14which covers the South African Engineer Corps (SAEC) deployments to the East and North African theatres during the war and provides important insight on the influence of geography on the offensive operations in East Africa during the campaign and the strenuous efforts of the South African engineers to provision the Allied forces with sufficient water.
In 1987 Carel Birkby produced a biography on the erstwhile General Officer Commanding of the 1st SA Div - George Brink, titled Uncle George: The Boer Boyhood, Letters and Battles of Lieutenant-General George Edwin Brink,15 which allowed for an interesting view on the strategic, operational and political decisions behind the South African campaign in East Africa. This work also adds valuable insights on the employment of South African troops and the battle handling of the South African division during the campaign. In 1990, James Ambrose Brown produced The War of a Hundred Days: Springboks in Somalia and Abyssinia 1940-1941,16as part of Ashanti Publishing's "South Africa at War" series. However, Brown fails to add new information and perspectives on the subject, and unsurprisingly this publication does not account for a number of operations in which South African troops were involved after the liberation of Addis Ababa in April 1941.17
Several contemporary academic publications supplement the available popular works on the South African campaign in East Africa. Gustav Bentz's 2012 article, "From El Wak to Sidi Rezegh: The Union Defence Force's First Experience of Battle in East and North Africa, 1940-1941",18 although restricted to a cursory analysis of the Battle of El Wak, provides a limited evaluation of its impact on the South African campaign. This article stems essentially from his 2013 MMil dissertation, titled Fighting Springboks: C Company, Royal Natal Carbineers: From Premier Mine to Po Valley, 1939-194519in which he devotes an entire chapter to the South African deployment to East Africa. Despite being a seminal work, particularly since it provides an unprecedented insight into the personal experiences of South African troops during the war, his analysis of the East African campaign, as with Hartshorn's, is limited to the offensive operations of the 1st SA Bde during the campaign. David Katz's 2014 MMil dissertation, Sidi Rezegh and Tobruk: Two South African Military Disasters Revisited, 1941-1942,20 though not focusing exclusively on the East African campaign, provides some discussion on the deployment of the UDF to this theatre. Katz highlights the many shortcomings during offensive operations and discusses the implications that these shortcomings had on the subsequent deployment of the South African forces to the Western Desert. The author's own 2014 MMil dissertation, Armoured Warfare: The South African Experience in East Africa 1940-1941 ,21 focuses on the deployment of South African armour in East African campaign, and addresses an aspect of the South African offensive operations that had received little or no previous scholarly attention.
In 2015, Ian van der Waag's A Modern Military History of South Africa22appeared, in which the author discusses the South African involvement in the Second World War at length in one of the chapters. Van der Waag's carefully researched book places the South African participation in the Second World War into a strategic context and provides an unprecedented analysis of the social, economic and political factors that underpinned the military involvement of the UDF in the war. Van der Waag's discussion of the East African campaign is, however, cursory at best, and he fails to discuss the strategic and operational consequences of the first South African operational deployment during the war. Andrew Stewart's The First Victory: The Second World War and the East Africa Campaign23, which first appeared in 2016, provides a highly critical account of the entire campaign in East Africa, with a detailed discussion at the operational and strategic levels of war. Stewart, while acknowledging the significant role played by the UDF during the campaign, rather surprisingly only glances casually over the offensive operations fought by Brink and his Division in southern Abyssinia in a mere paragraph, while the offensive operations through Italian Somaliland and Eritrea received the bulk of attention in his book. However, despite this shortcoming, it is in all likelihood the most complete account of the East African campaign to date. The most recent work to appear on the South African deployment to East Africa is the author's article "The South African Offensive Operations in Southern Abyssinia, 1940-1941".24 This article refocuses specific attention on the offensive operations of the 1st SA Div in southern Abyssinia through 1940-1941, which some contemporary historians regard as having no overall bearing on the successful outcome of the Allied campaign in East Africa.
Despite the above analysis of publications on the East African campaign and particularly the South African offensive operations through southern Abyssinia and Italian Somaliland, several glaring hiatuses remain. The offensive employment of the 1st SA Div in the East African theatre of operations, and more especially the pronounced impact of the Battle of El Wak on the overall Allied campaign, needs drastic reassessment. This article thus has two main aims. First, it provides a brief discussion on the Battle of El Wak, by placing this specific battle and its importance into the overall strategic and operational framework of the Allied campaign in East Africa. Second, by taking recourse to the theoretical notion of "first battles", the article re-evaluates the impact of the Battle of El Wak on the overall South African campaign through a number of salient points. They are: the changing nature of the South African offensive operations; the character and effectiveness of the Italian military forces; and the adverse influence of climate and terrain on the South African deployment in the war theatre. In doing so, the article uncovers aspects of the South African campaign which have received little or no previous scholarly attention.
The Battle of El Wak
Throughout December 1940 the General Officer Commanding East Africa Force, Lt Gen Alan Cunningham, grew eager to launch an attack somewhere along the Kenya-Italian Somaliland border. This was due to mounting pressure from the commanderin-chief of the Middle East, Lt Gen Sir Archibald Wavell, as well as the respective prime ministers of Britain and South Africa - Winston Churchill and Jan Smuts. The planned attack was significant for three reasons.
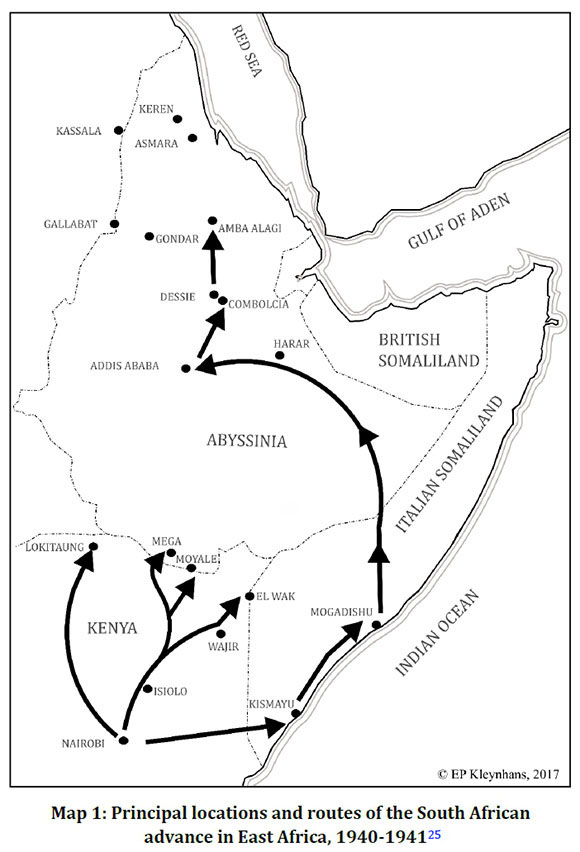
Firstly, an attack would reduce the vast area of no-mans-land between Cunningham's forward positions in Kenya and that of the Italian vanguard in southern Abyssinia and Italian Somaliland. Secondly, such an attack would provide Allied engineers with the opportunity to improve vital communication links and water sources in the inhospitable Northern Frontier District (NFD) of Kenya to support the planned offensives. Lastly, Cunningham believed that he could gain psychological ascendancy over the Italian troops by attacking isolated outposts and through sustained offensive patrols.26 Cunningham maintained that the culmination of the Allied troop training in the NFD of Kenya should be an attack on an Italian-defended locality. After the first location chosen for an attack had been found unoccupied by Italian troops, he decided that the defended Italian outpost at El Wak would suffice as an objective for Maj Gen Alfred Godwin-Austen's 12th African Division. El Wak straddled the Kenya-Italian Somaliland border and was approximately 176km to the north-east of Wajir (see Map 1 above). The entire force earmarked for the offensive against El Wak carried out a full dress rehearsal of the attack before the launch of the operation. This gave the troops and their respective commanders valuable insight on their precise roles in the operation - with particular attention paid to navigation, as well as night marching and movement with vehicles.27
Before the Allied advance on the Kenya-Italian Somaliland border commenced, aerial reconnaissance conducted by the South African Air Force (SAAF) provided Godwin-Austen with valuable intelligence on the Italian defensive dispositions as well as on the approaches to El Wak. Godwin-Austen believed that a double envelopment, demanding a high degree of unity of action between his attacking forces, was needed to rid the area of its defenders.28 According to intelligence reports, the Italian garrison at El Wak consisted of approximately one battalion of infantry, some Banda irregulars and approximately sixteen guns,29 and that they would possibly withdraw from the area at the first sign of an Allied advance. Godwin-Austen decided to use Brig Collen Richards' 24th Gold Coast Bde, codenamed DICKFORCE, and Brig Dan Pienaar's 1st SA Bde, known as PINFORCE, for the attack on El Wak (see Map 2 below).30

The attack on El Wak was scheduled for 16 December 1940, and both PINFORCE and DICKFORCE planned to leave Wajir on 14 December to make for their respective staging areas in the proximity of the British landing ground. The separate staging areas had to be occupied before first light on 15 December, after which there was to be no movement during daylight. Once dusk settled in, DICKFORCE would move forward, seize the British landing ground and then advance on the boundary cut. It would then be split into two separate columns and secure the objectives at Italian El Wak (Area X), British El Wak (Area Z) and the strategic waterholes at El Ghala (Area Y).32 PINFORCE was to cut the road to Bardera and capture the village of El Buru Hachi (Area W) while concurrently threatening the Italian Brigade Headquarters (Area V) (see Map 2).33
The advance of DICKFORCE and PINFORCE on El Wak occurred without any real interruption, despite fears that Italian scouts had observed their advance.34During the night of 15 February DICKFORCE fended off an Italian attack as they advanced through the dense bush towards the border cut, while the South African light tanks trampled a road through the dense scrubland allowing the infantry to move forward in their wake.35 By daybreak Column A of DICKFORCE advanced to a position east of the border cut, and after a ten-minute artillery concentration by the South African Artillery (SAA), the attack on Italian El Wak commenced. The South African tanks led the advance on Italian El Wak, with the Gold Coast infantrymen following in their wake with fixed bayonets. The resistance from Italian El Wak was nominal and after clearing the area of resistance, the tanks advanced towards El Allu and successfully engaged a strong Italian defensive position.36
The Italian Air Force disrupted the advance of Column B of DICKFORCE slightly when it attacked the column's troop carriers. The biggest obstacle in Column B, however, was the difference of opinion between the South Africans and their East African counterparts on the deployment of infantry and armour in a combined operation. The men of the East African Armoured Cars insisted that the South African infantrymen screen their advance, a rather foolhardy and antiquated tactical employment of armour. Consequently, the Cape Town Rifles, more commonly known as the "Dukes", led the advance into British El Wak under cover of a South African artillery bombardment. The artillery barrage sent the Italian defenders into a state of disrepair, and British El Wak and El Ghala were soon clear of all Italian resistance.37
By daybreak, the lead elements of PINFORCE had secured the British landing ground. A rather brief but haphazard Italian artillery and aerial bombardment failed to incur any damage on PINFORCE as they neared the boundary.38 The Transvaal Scottish crossed the boundary shortly after daybreak and immediately launched an attack on the Italian Brigade Headquarters astride the road to Bardera, which they soon overran. Following in their wake, the Royal Natal Carbineers started their advance on the Italian positions at Zariba which was found devoid of any visible Italian presence. The Carbineers in the meantime advanced to the outskirts of El Buro Hachi and soon became embroiled in a skirmish with its defenders.39 By midday, the Carbineers had begun to gain the upper hand in the fighting when the order to fix bayonets was given. Without hesitation, the men stormed El Buro Hachi chanting the units' Zulu war cry, and shortly after noon the town was cleared and the remaining Italian defenders routed. After a failed Italian counterattack, PINFORCE inflicted further heavy losses on the remaining Italian forces in the area.40 In the meanwhile, the Transvaal Scottish were ordered to exploit the area towards El Buro Hachi and join up with the Carbineers. During this foray, they discovered the main Italian Headquarters in the El Wak area and captured valuable intelligence documents that highlighted the Italian defensive lines and troop dispositions across large tracts of the East African theatre. During the day's offensive operations large stores of arms and ammunition were also captured.41 The men of DICKFORCE and PINFORCE accounted for their allotted objectives successfully before beginning the return journey to Wajir on 17 December.42
Cunningham's advance on the Italian Somaliland border, and the subsequent Allied victory at El Wak, heralded the new impetus needed for the commencement of the offensive operations in East Africa. The Italians had been tried, tested, and found wanting at El Wak. Furthermore, the victory highlighted the inadequacies and lack of willpower of the Italian soldiers to make a concerted stand when attacked, while the South African soldiers proved they were a worthy fighting force during the assault.
The support that the SAAF and SAA gave to both DICKFORCE and PINFORCE throughout the operation was remarkable, and this air-to-ground cooperation proved crucial to locating the Italian positions in the dense bush of East Africa. The attack on El Wak was the first time the UDF undertook a planned offensive action during the war, apart from brief skirmishes with local Banda groups during previous reconnaissance patrols in the NFD. In fact, El Wak was the first time that the South African troops were able to confirm the merits of combined arms warfare during an offensive operation.43 This method subsequently became the hallmark of the South African operations during the remainder of the campaign; thereafter it was only adversely affected by geographical and climatological factors. Furthermore, the South African troops were able to practise night movement and navigation during their advance on El Wak, a feat they were obliged to repeat time and again during the campaign in North African. The victory at El Wak was achieved at a relatively small cost with two South African soldiers killed and a handful of South African and East African troops injured. The Italian forces, however, had over 100 men killed, with a large variety of guns and war materiel captured by the Allied troops.44

The Allied victory at El Wak was significant for three reasons. First, the belief that Italian morale was far superior to that of the Allied forces, especially after the capture of British Somaliland and the reverses suffered at Moyale, Gallabat and Kassala during mid-1940, was immediately proven wrong. Indeed, the opposite was shown as most of the Italian defenders around El Wak had simply chosen to retreat rather than stomach a fight. Further, the victory at El Wak ensured that the Allied morale was on the ascent and this remained so for the rest of the campaign. Second, after the fall of El Wak, the Italian High Command decided to withdraw all Italian forces to their defensive line on the Juba River in Italian Somaliland. Only a handful of Banda were left to the west of the river to act as harassing troops, while two well-fortified Italian outposts remained at Afmadu and Kismayu. Finally, the victory at El Wak decided the pace and intensity of the remainder of the campaign in East Africa.46During December 1940 Cunningham decided to postpone his offensive operations from Kenya until May/June 1941. His decision, contrary to Wavell's original plan, was based on several considerations, of which the scarcity of water supplies in the NFD47and insufficient motor transport to provision his forces along his lines of communications proved paramount.48 The Allied forces' thrust towards Addis Ababa was, however, hastened by six months after the success at El Wak, mainly because Cunningham realised that it was possible to secure a firm foothold across the Juba River by the time the dreaded torrential rains arrived.49
A critical analysis of the campaign
The term "first battles", as defined by Charles Heller and William Stofft in America's First Battles, 1776-1965, refers to:
... [the] first engagement in a war when the strengths and weaknesses of an army's peacetime preparation, doctrinal development and force design, as well as the mobilization for the war itself, are tested by the exigencies of conflict and are found either to be good or in demand of urgent, wartime adjustment.50
The Battle of El Wak is, in fact, a prime tool through which to measure the peacetime preparation of the UDF; its subsequent mobilisation for war; how it fought its first battle in East Africa; and of immense importance, how it adapted to the operational exigencies created during the ensuing campaign. While the peacetime preparation and the initial mobilisation of the UDF, at a cursory glance proved somewhat problematic, the article focuses instead on the impact of the Battle of El Wak as part of the broader South African operational deployment. Thus, by following the theory of "first battles" as outlined above, the impact of the Battle of El Wak on the unfolding South African campaign is evaluated through the changing nature of the South African operations, the character and effectiveness of the Italian military forces, and the adverse influence of climate and terrain on the UDF deployment in the theatre.
The nature of the South African operations in East Africa varied considerably between that of the 1st SA Div, which operated in the southern Abyssinian province of Galla-Sidamo, and the 1st SA Bde which served with the 11th and 12th African Divisions through Italian Somaliland and into central Abyssinia. The 1st SA Div comprised of the Second South African Brigade (2nd SA Bde), commanded by Brig Ferdinand Buchanan, and the Fifth South African Brigade (5th SA Bde), commanded by Brig Frank Armstrong. The 1st SA Div had a very limited campaign in East Africa with its offensive operations in the Galla-Sidamo lasting only from mid-January 1941 to the capitulation and capture of the Italian fort at Mega on 18 February 1941. The 1st SA Div was initially tasked with securing the area around Dukana, Hobok and Gebel Affur, which culminated in a flanking attack on the Mega-Moyale escarpment. Brink was furthermore tasked to use flying columns, invariably consisting of armoured cars from the South African Tank Corps (SATC) units in his Division, to support the Shifta Rebellion forming in southern Abyssinia.51 Wavell instructed Cunningham to employ these South African troops on irregular lines,52 because this style of warfare, it was argued, suited the UDF psyche for mobile operations, largely considered to be South Africa's national arm.53
Despite the Italian Somaliland operations receiving priority, Cunningham realised that Brink and his Division could play an active role in threatening Addis Ababa before the arrival of the rainy season.54 Brink's offensive began officially on 15 January 1941, and he realised at once that water, and the access to it, would be the single most significant factor which would either confer success or defeat upon his Division during the coming offensive into Abyssinia. To sustain the physical and mechanical needs of his men and their Armoured Fighting Vehicles (AFV), and to deny the Italians the use thereof, Brink accepted that his Division would have to capture and control all the water sources along the Kenyan frontier. Brink argued that the occupation of these water sources would ease the advance of his forces into Abyssinia significantly by relieving pressure off his already stretched lines of communication.55 These movements were collectively known as the "cutting out" operations and would culminate in the establishment of a series of administrative facilities and supply depots along this defensive line to secure sufficient stockpiles before the main Allied offensive began in January 1941.56 The first battle for Brink's Division was fought between 16 and 17 January 1941, when Buchanan's 2nd SA Bde was ordered to occupy and hold the wells at El Yibo and El Sardu.57 The Battle of El Yibo, unlike the attack by Pienaar's Brigade on El Wak, was but a staccato affair.58 The plan was to envelop the Italian forces occupying the area around El Yibo by armour and infantry acting in a mutually supportive role, similar to the operation carried out at El Wak.

The three biggest obstacles facing the South African fighting patrol were the extreme heat, the lack of adequate maps and a severe shortage of water. Interestingly the biggest problem encountered during the Battle of El Yibo, however, was that of command and control which surfaced at the tactical level during the fight. Unity of action and command between the armoured cars and the infantry remained an issue throughout the operation to the extent where the fighting patrol's effective deployment was essentially negated during the battle. It seems as if the infantry did not understand the doctrine that governed the employment of armour during operations. It was even felt that infantry officers should not issue orders directly to individual armoured cars. This was unfortunately not an isolated case, with similar problems coming to the fore on several other occasions during the campaign.60 The capture of El Yibo and El Sardu were completed within three days without meeting any real Italian resistance. The South African capture of the wells at El Yibo and El Sardu, as well as the actions fought in the vicinity of the Turbi Hills and Sololo, ensured that the frontier regions of the Kenyan border were cleared of the Italian presence by the end of January 1941. These actions convinced Brink and his men that the nature and speed of their operations called for the accepted doctrine to be abandoned in lieu of tactical and operational requirements. This would become a hallmark of the South African offensive operations during the East African campaign.61
Late in the afternoon of 31 January, the lead elements of Brink's 1st SA Div started to cross the Kenyan frontier into southern Abyssinia. During the ensuing offensive, the 2nd and 5th SA Bdes, captured the Italian strongholds at Gorai (1 February), El Gumu (1 February), Hobok (2 February), Banno (9 February) and Mega (18 February). Brink's offensive in southern Abyssinia was marked by a high degree of mobility, as well as mutually supportive attacks by infantry, armour and the air force. It would seem that Brink's men, by this time, understood the merits of the combined-arms approach during offensive operations. During the attacks on Gorai, El Gumu, Hobok and Banno, the South Africans met only token resistance from the Italian colonial and irregular defenders, while the armoured cars showed immense courage and dash during each attack.62 The strongest Italian bastion left in southern Abyssinia, the fort at Mega, was protected by experienced Blackshirt and Colonial Infantry battalions, reinforced by heavy artillery and a series of minefields. Brink was anxious when planning for the attack on Mega, because the assault on the fort would be the first instance during the entire campaign when South African fighting skills would be matched against a predominantly white Italian force. Brink's plan for the assault on Mega was based on an envelopment, aimed at cutting the Italian line of retreat into the Abyssinia hinterland. The main attack on Mega was primarily an infantry affair, and the ensuing battle was fought in appalling weather. The successful occupation of the fort at Mega by the 1st SA Div ensured that Brink had cleared southern Abyssinia of all forms of Italian resistance.63 The 1st SA Div had accumulated a string of operational and tactical victories, including the capture of a vast number of Italian men and equipment. At the same time, its actions partly helped to foster a Shifta revolt in southern Abyssinia. The advantages of close cooperation between infantry, armour and the air force became paramount throughout Brink's offensive in the south of Abyssinia. By April 1941 the 1st SA Div was withdrawn from the theatre and redeployed to North Africa.64
After the 1st SA Bde's success at El Wak, the Italian forces fell back to the Juba River the only natural, defendable feature in Italian Somaliland and the site of the main Italian defensive line. Cunningham's plan for the advance into Somaliland required swift, sharp action, essential in capturing adequate supplies and water at Afmadu, Jelib, Gobwen, Jumbo and the coastal port of Kismayu. The advance into Italian Somaliland began effectively on 12 February.65 Godwin-Austen informed Pienaar on the role envisaged for his 1st SA Bde during the coming offensive, stating:
... the Infantry ... alone, by vigorous assault by the bayonet, can win the day. They must not have any idea that a complete victory can be won by shattering the enemy by artillery and tanks ... The tanks must not be left hanging about on the objective.66
Pienaar, however, believed in the combined-arms approach. Its merits had been proved to him at El Wak. By mid-February, owing to a rapid advance and the fact that the Italians soldiers made no viable defensive stand, Afmadu, Gobwen and Kismayu were taken. Pienaar forded the Juba River at Yonte on 17 February, whereafter the 1stSA Bde captured Jumbo, Margherita and Jelib by the end of February 1941.

The British historian Andrew Stewart has described the fording of the Juba River as one of the most significant events, not only of the campaign, but of the entire war fought in Africa, because the successful crossing of the Juba River before the big rains meant that the hinterland of Italian Somaliland was now open for a rapid advance along the tarred Strada Imperiale highway.68
The new route of advance negated the active employment of the South African armour because of sudden, drastic changes in the terrain. The dense bush and open desert flats which were characteristic of the Italian Somaliland coastal belt, and conducive to the effective employment of armour, gave way to the sweeping mountains which dominated southern and central Abyssinia. This meant that South African armoured cars were for the most part confined to roads and tracks and lost their freedom of movement.69 The Allied advance was extremely rapid and after the battlefield successes at the Marda Pass (21 March), Harar (25 March) and Diredawa (29 March), Addis Ababa was occupied on 6 April 1941.
The fall of Addis Ababa did not see the end of hostilities in Abyssinia, however, because the Duke of Aosta and his Eritrean and Central Armies occupied a series of well-established mountain defences at Dessie and Amba Alagi where they intended to make a final stand. The South African forces were redeployed initially on counter-insurgency operations to protect the local Italian population against the marauding Shifta bands around Addis Ababa, and thereafter fought in the battles at Combolcia (25 April) and Dessie (27 April). The penultimate battle for Amba Alagi was the final chapter in the complete collapse of Benito Mussolini's East African Empire, save for the battles fought up until the surrender of Gen Nasi at Gondar in November 1941. Lasting for approximately fifteen days, the assault on Amba Alagi pitted South African, Indian and British attackers against their Italian counterparts in some of the harshest fighting conditions the East Africa Force experienced in the entire campaign. The Allied pincers on Amba Alagi closed in steadily from the north and the south, and by 16 May 1941, the Duke of Aosta was forced to sue for an armistice. The fall of Amba Alagi meant the end of the road for the men of the 1st SA Bde in East Africa. In a mere 53 days, Cunningham's troops advanced more than 1 700 miles from the Kenyan frontier to Addis Ababa, occupying some 360 00 square miles and capturing more than 50 000 prisoners, all for the loss of 135 men killed, 310 wounded and another 59 missing. The South African losses alone were 73 men killed with an additional 197 battle-related casualties.70
The character and effectiveness of the Italian armies in East Africa played a definite role in the ever-changing deployment of the South African forces as the Allied campaign unfolded throughout 1940-1941. The bold use of armour as part of the Allied spearhead in East Africa was a direct consequence of the waning fighting ability of the Italian soldiers, as experienced by the South African forces during the initial offensive operations.71 There were, however, some salient points for the Allies to consider before the launching of an all-out offensive in East Africa. The Italian armies were known to be numerically superior, although the fighting quality of the Italian soldiers ranged from good to indifferent, and the Italian armoured units and artillery were seldom employed in large numbers.72 Initially, their fighting quality was adequately judged by the South Africans in the Battle of El Wak after the UDF's "first battle" in East Africa. The poor fighting ability of the Italian colonial and irregular soldiers was realised immediately after this encounter, and the novel employment of the South African forces during the latter offensive operations bears testimony to this. As the campaign unfolded, it became evident that the Italian soldiers were demoralised and that they realised the futility of trying to defend their tactical positions against the might of a combined-arms attack.73Cunningham commented that the main difference between his troops and those facing them was that the British and Commonwealth troops were "mobile and dashing while [the Italians] were sluggish and unenterprising."74

The lacklustre fighting character of the Italian soldier in East Africa ensured that when a South African armoured attack struck, the accompanying infantry was often left with mere mopping up operations to carry out on the objectives. The growing boldness of the South African employment of armour, however, annoyed Cunningham to such an extent that in a letter to Brink he stated that it should be used primarily as an infantry support weapon, and "that their firepower ... during this period was protective and not offensive". In return, Brink scribbled a note on Cunningham's letter: "... but my object in using the Armoured Cars boldly was to put the fear of God into the enemy's native (sic) troops and in this we were most successful".76 An Italian soldier also remarked that "you only have to make a noise like an armoured car and you will be in Mogadishu in a fortnight".77
The fact that most of the Banda fled at the first sight of the armoured cars, or after a brief skirmish, was ample evidence of the effect Brink sought. Hence the fact that Hartshorn refers to the South Africans as the "Apostles of Terror" in his 1952 treatise Avenge Tobruk, where he gives a vivid description of the South African tactics as "... [to] turn the flank, crawl like snakes, and dash in like lions".78 One can perhaps even argue that the South African armoured cars were used as a psychological weapon and that the fear they instilled in the Italian colonial and irregular levies were paramount to its operational successes.79 Brink employed his armour in exactly that fashion during the attacks on El Yibo, El Sardu, Gorai, El Gumu, Hobok and Banno, while Pienaar deployed his armour in a similar manner at El Wak, the battles around the Juba River and throughout the rest of the advance towards Addis Ababa.80 The waning fighting efficiency and determination of the Italian military forces in Italian Somaliland and Abyssinia directly influenced the bold, and at times foolhardy, tactical and operational deployment of South African forces. The British war correspondent, Alan Moorehead, when describing the nature of the Allied operations in East Africa, perhaps best describes the nature of the South African operations when he said:
Most of the preconceived ideas of colonial warfare went west in Abyssinia ... As the guns breasted each rise they blasted the enemy out of the valley below and charged after them. It was untechnical and unprecedented, and it knocked the Italians into bewildered surrender.81
There were, however, some occasions during the East African campaign where the Italian forces put up a stout defence. These include the battles of Uaddara, Combolcia, Dessie, and Amba Alagi, fought during the latter half of the Abyssinian campaign and after the fall of Addis Ababa. These actions occurred mainly in the Abyssinian highlands, during adverse weather, and were principally infantry and artillery affairs.82 Although Italian armoured units were deployed in relatively small numbers during the campaign, they remained an ever-present threat. The most prominent of these was the arrival of Italian tanks at El Sod and at the Dadaba River where the South Africans were ordered to withdraw amid great confusion.83 While serving as an effective weapon when attacking infantry, the South African armoured units avoided an armoured engagement with their Italian counterparts throughout the campaign, probably in recognition of the fact that the Italian armour's armament was superior to their own. In fact, each time the Italian armoured cars and tanks appeared on the battlefield, the South African armour was forced to withdraw or suffered some losses.
In hindsight, the provision of an anti-tank gun on the South African armoured cars might have enabled them to engage Italian armour in East Africa successfully. The South Africans enjoyed relative success when encountering Banda, but on the other hand, the Italian Colonial Infantry and Blackshirts provided fierce resistance on a number of occasions by using the natural surroundings to their advantage.84 The untimely destruction of the Italian Air Force also left the Italians with inadequate air support throughout the campaign, which meant that the South African forces often deployed in a rather brash fashion, with no real movement control for want of enemy aerial interdiction. This was in stark contrast to the accepted UDF standing orders and doctrine and cost the South Africans dearly in North Africa where the German Air Force provided an ever-present danger.85
The geography of East Africa conferred both a strategic and tactical advantage in defence on the Italians - although they never really used it to their advantage. The unforgiving East African terrain covered an area of some 540 000 square miles which extended from the flat, featureless and almost waterless bush of the NFD in Kenya, to the coastal plains of Italian Somaliland and the rolling bush country and mountains of Abyssinia.86 The Abyssinian plateau, covering more than half of Italian East Africa, provided an excellent defensive position, especially against attacks from the Sudan or Kenya. The Kenyan Highlands, in turn, offered the Allied forces a strong defensive position from which they could protect their lines of communications stretching into the NFD.87 The NFD was a low-lying, waterless, semi-desert which stretched for 250 miles from the frontier and was a significant obstacle to any force trying to traverse it. Furthermore, in the rainy season, it became a quagmire which made any movement difficult.88 The rough nature of the terrain hampered the employment of the UDF troops throughout the campaign and led to the novel employment of the South African forces in East Africa.89
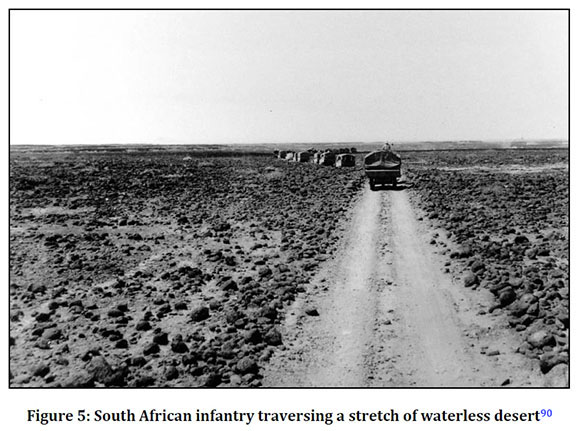
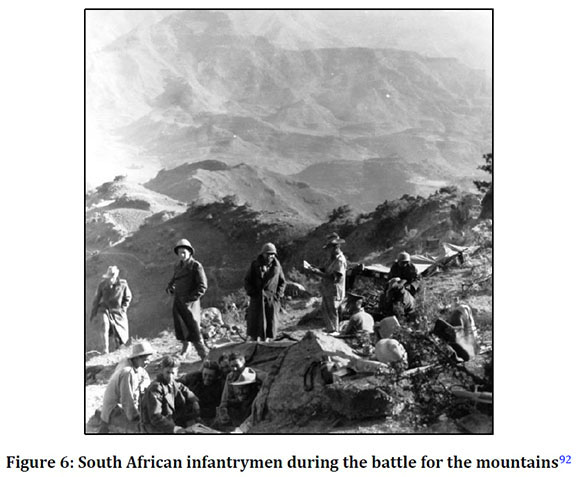
During the opening salvos of the campaign, the terrain allowed for the varied employment of the South African armoured cars, tanks and motorised infantry owing to the ability of the fighting vehicles to deploy cross-country quickly. With few undulations in the terrain, the armour was predominantly used in wide flanking movements throughout the bush, often allowing the South African commanders to effect an envelopment and gain both a tactical and operational surprise. As the campaign progressed from the vast open spaces of Italian Somaliland and the NFD to the mountainous highlands of southern and central Abyssinia, the South African operational deployment underwent a drastic change. The use of armour became limited because of the extreme changes in terrain, and after the capture of the Marda Pass, the ever-present open flanks, so conducive to armoured warfare, completely disappeared. In fact, the mobile, rapid phase of the southern advance was replaced by a tedious infantry slog for the mountains. This drastic change in terrain meant that the South African commanders had to reassess their operational strategies and tactics from that of mobile warfare to largely static/mountain warfare. In fact, the exigencies of mountain warfare were an entirely new experience for the South African soldiers, who were far more adept at mobile warfare. As a result, South African operational losses rose during this period of the campaign, with the infantry bearing the brunt of the fighting. The next time South African soldiers experienced similar terrain was during the campaign in Italy in 1944 with the 6th South African Armoured Division. Despite the defensive advantages offered by the East African terrain, the Italian defence of the theatre was all but negligible.91
In addition, the East African climate influenced the operational efficiency and employment of the South African forces. Due to the heavy rainfall and extreme temperatures in the NFD and the coastal areas, diseases were particularly prevalent.93 As such, it was an area of operations not suited to a lengthy military adventure.94 Malaria, especially prevalent in the NFD, necessitated the issue of adequate supplies of quinine. Dysentery, owing to the high levels of salts present in the soil and thus the water, also caused major health problems among the South African troops.95 The single biggest factor determining the pace of the Allied operations in East Africa, as Cunningham acknowledged while planning his offensive operations, was the East African rainy season.96

There were two distinct rainy seasons in East Africa; a "small" one towards the latter half of the year, and a "big" one from April onwards. Despite this rainfall, and the presence of some large rivers, water remained a scarce commodity throughout the year.98 The access to and availability of water were thus specific determinants in the separate South African and Allied attacks.99 While the SAEC attempted to secure access to all the available water sources in the regions bordering the Italian East Africa Empire, especially in the NFD, armour was used concurrently as a means to secure distant wells and provide protection until occupation troops arrived. It was known that the advent of the torrential rains would turn the operational theatre into a muddy quagmire which would hamper military operations severely. Hence all offensives were launched before the beginning of the big rains, thanks to the timely victory in the Battle of El Wak. Predictably, when the heavy rains arrived in April 1941, the South African forces' mobility was curtailed severely and the offensive operations had to be halted for a few months. By then, however, most of the strategic objectives had been achieved.100 Despite the adverse effect of several climatological factors on the East African theatre of operations, the South African forces continued their successful deployment throughout 1941.
Conclusion
The Allied offensives in East Africa began with the successful attack on El Wak during which some South African troops received their baptism of fire. The combat experience gained by the South African troops at El Wak proved paramount, as it was the first instance during the war in which the UDF was able to gauge its fighting efficiency and hence evaluate and adapt its doctrine and standing orders. Furthermore, the feeble Italian defence during the Battle of El Wak highlighted the ineffectiveness and inadequacies of Italian forces in East Africa. Though the Battle of El Wak was not crucial to the Allied victory in East Africa, it was the impetus required for the start of offensive operations in the East African theatre before the arrival of the rainy season. Between January and May 1941, the East Africa Force launched a series of successful attacks across Abyssinia and Italian Somaliland, culminating in the capture of Addis Ababa and the penultimate battle of Amba Alagi. At the time the campaign was described as a military record, with the offensive operations being carried out at a pace seldom surpassed in history. The South African troops played a vital role in securing the first campaign victory of the war, and often acted as the vanguard during offensive operations across the theatre. The South African successes in East Africa were, however, something of an anomaly; the lessons learnt from this campaign did not prepare the UDF sufficiently for its subsequent deployment to the North African theatre. These lessons would, in fact, have to be re-learnt in the Western Desert, where the nature of the enemy, its weapons and tactics could once more only be measured during the "first battle" in the desert.
REFERENCES
Agar-Hamilton, J. and Turner, L.C.F., Crisis in the Desert, May-June 1942 (Oxford University Press, Cape Town, 1952). [ Links ]
Agar-Hamilton, J., and Turner, L.C.F., The Sidi Rezegh Battles, 1941 (Oxford University Press, Cape Town, 1957). [ Links ]
Ambrose Brown, J., The War of a Hundred Days: Springboks in Somalia and Abyssinia 1940-41 (Ashanti, Johannesburg, 1990). [ Links ]
Bentz, G., "From El Wak to Sidi Rezegh: The Union Defence Force's First Experience of Battle in East and North Africa, 1940-1941", Scientia Militaria, 40, 3 (2012). [ Links ]
Bentz, G., "Fighting Springboks - C Company, Royal Natal Carbineers: From Premier Mine to Po Valley, 1939-1945", MMil Thesis, Stellenbosch University, 2013. [ Links ]
Birkby, C., Springbok Victory (Libertas, Cape Town, 1941). [ Links ]
Birkby, C., It's a Long Way to Addis (F. Muller, London, 1943). [ Links ]
Birkby, C., Uncle George: The Boer Boyhood, Letters and Battles of Lieutenant-General George Edwin Brink (Jonathan Ball, Johannesburg, 1987). [ Links ]
Collyer, J.J., The Campaign in German South West Africa, 1914-1915 (Government Printer, Pretoria, 1937). [ Links ]
Collyer, J.J., The South Africans with General Smuts in German East Africa, 1916 (Government Printer, Pretoria, 1939). [ Links ]
De Vries, R., Mobiele Oorlogvoering: 'n Perspektief vir Suider Afrika (Harman Uitgewers, 1987, Pretoria). [ Links ]
De Vries, R., Eye of the Firestorm: Strength Lies in Mobility (Naledi, Tyger Valley, 2013). [ Links ]
Grey, J.G., '"Standing humbly in the ante-chambers of Clio': The Rise and Fall of Union War Histories", Scientia Militaria 30, 2 (2000). [ Links ]
Hartshorn, E.P., Avenge Tobruk (Purnell, Cape Town, 1960). [ Links ]
Hattersley, A.F., Carbineer: The History of the Royal Natal Carbineers (Gale & Polden, Aldershot, 1950). [ Links ]
Heller, C.E. and Stofft, W.A. (eds), America's First Battles, 1776-1965 (Kansas University Press, Lawrence, 1986). [ Links ]
House, J.M., Combined Arms Warfare in the Twentieth Century (Kansas University Press, Lawrence, 2001). [ Links ]
Katz, D.B., "A Case of Arrested Development: The Historiography Relating to South Africa's Participation in the Second World War", Scientia Militaria, 40, 3 (2012). [ Links ]
Katz, D.B., "Sidi Rezegh and Tobruk: Two South African Military Disasters Revisited 1941-1942", MMil Thesis, Stellenbosch University, 2014. [ Links ]
Klein, H., Springboks in Armour: The South African Armoured Cars in World War II (Purnell, Johannesburg, 1965). [ Links ]
Kleynhans, E.P., "Armoured Warfare: The South African Experience in East Africa, 1940-1941", MMil Thesis, Stellenbosch University, 2014. [ Links ]
Kleynhans, E.P., "The South African Offensive Operations in Southern Abyssinia, 1940-1941", International Journal of Military History and Historiography, 38, 1 (2018). [ Links ]
Martin, H.J. and Orpen, N., South African Forces World War 2, Volume 7, South Africa at War: Military and Industrial Organization and Operations in Connection with the Conduct of the War, 1939-1945 (Purnell, Cape Town, 1979). [ Links ]
Martin, H.J. and Orpen, N., South African Forces World War 2, Volume 8, Salute the Sappers, Part 1 (Sappers Association, Johannesburg, 1981). [ Links ]
Norton, C. and Krige, U., Vanguard of Victory: A Short Review of the South African Victories in East Africa, 1940-1941 (Government Printer, Pretoria, 1941). [ Links ]
Orpen, N., South African Forces World War 2, Volume 1, East Africa and Abyssinian Campaigns (Purnell, Cape Town, 1968). [ Links ]
Pollock, A.M., Pienaar of Alamein: The Life Story of a Great South African Soldier (Cape Times Ltd, Cape Town, 1943). [ Links ]
Simpson, J.S.M., South Africa Fights (Hodder & Stoughton, London, 1941). [ Links ]
Stewart, A., The First Victory: The Second World War and the East Africa Campaign (Yale University Press, London, 2016). [ Links ]
Turner, L.C.F., Gordon-Cumming, H. and Betzler, J., War in the Southern Oceans, 1939 1945 (Oxford University Press, Cape Town, 1961). [ Links ]
Van der Waag, I.J., "Contested Histories: Official History and the South African Military in the Twentieth Century", in Grey, J.G. (ed.), The Last Word? Essays on Official History in the United States and British Commonwealth (Praeger, Westport, 2003), pp 27-53. [ Links ]
Van der Waag, I.J., A Military History of Modern South Africa (Jonathan Ball, Cape Town, 2015). [ Links ]
Visser, G.E., "South African Military Water Diviners in Kenya during World War II", Water Wheel, 10, 5 (2011). [ Links ]
Visser, G.E. and Nyanchaga, E., "The South African Engineer Corps's Water Supply Operations in Kenya during the Second World War: Its Wartime Impact and Postwar Legacy", Journal for Contemporary History, 37, 2 (2012). [ Links ]
* His research interests include the South African participation in both World Wars, as well as the wider milieu of war and society in southern Africa. This article is in part drawn in part from his MMil dissertation.
1 . C. Birkby, Springbok Victory (Libertas, Cape Town, 1941).
2 . C. Norton and U. Krige, Vanguard of Victory: A Short Review of the South African Victories in East Africa 1940-1941 (Government Printer, Pretoria, 1941).
3 . C. Birkby, It's a Long Way to Addis (F. Muller, London, 1943).
4 . J.S.M. Simpson, South Africa Fights (Hodder & Stoughton, London, 1941).
5 . A.M. Pollock, Pienaar of Alamein: The Life Story of a Great South African Soldier (Cape Times Ltd, Cape Town, 1943).
6 . E.P. Hartshorn, Avenge Tobruk (Purnell, Cape Town, 1960).
7 . H. Klein, Springboks in Armour: The South African Armoured Cars in World War II (Purnell, Johannesburg, 1965).
8 . I.J. van der Waag, "Contested Histories: Official History and the South African Military in the Twentieth Century", in J.G. Grey (ed.), The Last Word? Essays on Official History in the United States and British Commonwealth (Praeger, Westport, 2003), pp 36-41.
9 . J.G. Grey, '"Standing humbly in the ante-chambers of Clio': The Rise and Fall of Union War Histories", Scientia Militaria 30, 2 (2000), pp 260-264. The three publications are: J. Agar-Hamilton and L.C.F. Turner, Crisis in the Desert, May-June 1942 (Oxford University Press, Cape Town, 1952); J. Agar-Hamilton and L.C.F. Turner, The Sidi Rezegh Battles, 1941 (Oxford University Press, Cape Town, 1957); L.C.F. Turner, H. Gordon-Cumming and J. Betzler, War in the Southern Oceans, 1939-1945 (Oxford University Press, Cape Town, 1961).
10 . D.B. Katz, "A Case of Arrested Development: The Historiography Relating to South Africa's Participation in the Second World War", Scientia Militaria, 40, 3 (2012), pp 282-284.
11 . Katz, "A Case of Arrested Development", pp 284-295, p 308.
12 . N. Orpen, South African Forces World War 2, Volume 1: East Africa and Abyssinian Campaigns (Purnell, Cape Town, 1968).
13 . H.J. Martin and N. Orpen, South African Forces World War 2, Volume 7: South Africa at War: Military and Industrial Organization and Operations in Connection with the Conduct of the War, 1939-1945 (Purnell, Cape Town, 1979).
14 . N. Orpen and H.J. Martin, South African Forces World War 2, Volume 8: Salute the Sappers, Part 1 (Sappers Association, Johannesburg, 1981).
15 . C. Birkby, Uncle George: The Boer Boyhood, Letters and Battles of Lieutenant-General George Edwin Brink (Johannesburg, Jonathan Ball, 1987).
16 . J. Ambrose Brown, The War of a Hundred Days: Springboks in Somalia and Abyssinia 1940-41 (Johannesburg, Ashanti, 1990).
17 . Katz, "A Case of Arrested Development", pp 285, 302.
18 . G. Bentz, "From El Wak to Sidi Rezegh: The Union Defence Force's First Experience of Battle in East and North Africa, 1940-1941", Scientia Militaria, 40, 3 (2012).
19 . G. Bentz, "Fighting Springboks - C Company, Royal Natal Carbineers: From Premier Mine to Po Valley, 1939-1945", MMil Thesis, Stellenbosch University, 2013.
20 . D.B. Katz, "Sidi Rezegh and Tobruk: Two South African Military Disasters Revisited 1941-1942", MMil thesis, Stellenbosch University, 2014.
21 . E.P. Kleynhans, "Armoured Warfare: The South African Experience in East Africa, 1940-1941", MMil Thesis, Stellenbosch University, 2014.
22 . I.J. van der Waag, A Military History of Modern South Africa (Jonathan Ball, Cape Town, 2015).
23 . A. Stewart, The First Victory: The Second World War and the East Africa Campaign (London, Yale University Press, 2016).
24 . E.P. Kleynhans, "The South African Offensive Operations in Southern Abyssinia, 19401941", International Journal of Military History and Historiography, 38, 1 (2018).
25 . Map drawn by the author.
26 . Kleynhans, "Armoured Warfare", p 61.
27 . Orpen, East Africa and Abyssinian Campaigns, p 71; Klein, Springboks in Armour, pp 26-27; A.F. Hattersley, Carbineer: The History of the Royal Natal Carbineers (Aldershot, Gale & Polden, 1950), p 68.
28 . Department of Defence Documentation Centre (hereafter DOD Archives), World War II War Diaries (hereafter WD), Box 299, File: East Africa Force, Report on Operations 1 November to 5 April 1941.
29 . Orpen, East Africa and Abyssinian Campaigns, p 71.
30 . DOD Archives, WD, Box 300, File: 12 AFR DIV, Report on Operations at El Wak, 30 December 1940.
31 . Orpen, East Africa and Abyssinian Campaigns, p 72.
32 . DOD Archives, WD, Box 217, File C-9 1DEOR, 1st Battalion Duke of Edinburgh's Own Rifles, December 1940; WD, Box 216, File C1-12 1 SA LT Tank Coy, War Diary of No. 1 Light Tank Company December 1940.
33 . DOD Archives, WD, Box 221, File A1-11 1 TS, War Diary 1st Bn Transvaal Scottish February 1941; WD, Box 219, File B1-6 1RNC, War Diary 1st Royal Natal Carbineers, December 1940; Hattersley, Carbineer, p 69.
34 . DOD Archives, WD, Box 300, File EA 128 12, AFR DIV. Report on Operations at El Wak, 30 December 1940.
35 . DOD Archives, WD, Box 216, File C1-12 1, SA LT Tank Coy. War Diary of No. 1 Light Tank Company December 1940.
36 . DOD Archives, WD, Box 216, File C1-12 1 SA LT, Tank Coy. War Diary of No. 1 Light Tank Company December 1940; WD, Box 300, File EA 128 12 AFR DIV, Report on Operations at El Wak, 30 December 1940.
37 . Orpen, East Africa and Abyssinian Campaigns, p 77.
38 . DOD Archives, WD, Box 215, File B1-8 3 ACC, War Diary No. 3 Armoured Car Company December 1940; Box 300, File EA: 128 12 AFR DIV, Report on Operations at El Wak, 30 December 1940; WD, Box 221, File A1-11 1 TS, War diary 1st Bn Transvaal Scottish December 1940; Orpen, East Africa and Abyssinian Campaigns, p 74.
39 . DOD Archives, WD, Box 221, File A1-11 1 TS, War Diary 1st Bn Transvaal Scottish December 1940; WD, Box 219, File B1-6 1RNC, War Diary 1st Royal Natal Carbineers December 1940; WD, Box 215, File B1-8 3 ACC, War Diary No. 3 Armoured Car Company December 1940.
40 . Hattersley, Carbineer, p 69.
41 . Hartshorn, Avenge Tobruk, pp 47-49.
42 . DOD Archives, WD, Box 287, File 1 SA Bde HQ Narrative 1941, El Wak Operation 31 December 1940.
43 . Combined arms warfare features coordination of infantry, artillery, armour, air support, intelligence, and other elements in military operations to ensure maximum operational or strategic effect. Warfare in 20th was marked by combined arms warfare. For more on this see for example J.M. House, Combined Arms Warfare in the Twentieth Century (Kansas University Press, Lawrence, 2001).
44 . DOD Archives, WD, Box 300, File EA 128 12 AFR DIV, Report on Operations at El Wak, 30 December 1940.
45 . South African National Museum of Military History, Masondo Reference Library, Johannesburg (hereafter Masondo Reference Library), East Africa Photo Collection, 332.
46 . Kleynhans, "Armoured Warfare", pp 61-67.
47 . G.E. Visser, "South African Military Water Diviners in Kenya in World War II", Water Wheel, 10, 5 (2011), pp 32-35; G.E. Visser and E. Nyanchaga, "The SA Engineer Corps's Water Supply Operations in Kenya during Second World War: Its Wartime Impact and Postwar Legacy", Journal for Contemporary History, 37, 2 (2012), pp 3251.
48 . Orpen, East Africa and Abyssinian Campaigns, p 69.
49 . DOD Archives, WD, Box 216, File C1-12, 1 SA LT Tank Coy, War Diary of No. 1 Light Tank Company December 1940; Klein, Springboks in Armour, pp 27-30; DOD Archives, WD, Box 299, File, East Africa, Report on Operations 1 November 1940-5 April 1941.
50 . C.E. Heller and W.A. Stofft (eds), America's First Battles 1776-1965 (Kansas University Press, Lawrence, 1986), pp ix-xiii.
51 . DOD Archives, WD, Box 283, File 1 SA Div Operation Instructions, Correspondence (Secret) Brink Buchanan - Armstrong re situation East African Front, 1 January 1941.
52 . DOD Archives, Union War Histories (hereafter UWH) Civil, Box 121, File 45/C/14, C-in-C's Conference at GHQ Middle East, 1-4 December 1940, Notes on C-in-C's Conference with GOC East Africa and GOC Sudan, 2 December 1940.
53 . Klein, Springboks in Armour, p vii; J.J. Collyer, Campaign in German South West Africa, 1914-1915 (Government Printer, Pretoria, 1937), pp 165-173; J.J. Collyer, The South Africans with General Smuts in German East Africa, 1916 (Government Printer, Pretoria, 1939), pp v-xvi; DOD Archives, Chief of the General Staff (CGS), Group 2, Box 519, File 944/11a, "Memorandum on matters discussed with Minister by Maj-Gen Brink and Brig Botha and Collyer, Pretoria, 18 August 1936. For a more contemporary interpretation see R. de Vries, Eye of the Firestorm: Strength Lies in Mobility (Naledi, Tyger Valley, 2013); R. de Vries, Mobiele Oorlogvoering: 'n Perspektief vir Suider Afrika (Harman Uitgewers, Pretoria, 1987).
54 . DOD Archives, UWH, Civil, Box 121, File 45/C/14, C-in-C's Conference at GHQ Middle East, Notes, GOC East Africa and GOC Sudan, 2 December 1940.
55 . DOD Archives, WD, Box 284, File Operational History of 1 S.A. Div., Report on Ops El Yibo-El Sardu; Birkby, Uncle George, pp 110-111.
56 . DOD Archives, UWH Civil, Box 121, File 45/C/14 - C-in-C's Conference at GHQ Middle East, Notes, GOC East Africa and GOC Sudan, 2 December 1940; UWH Civil, Box 121, File 45/C/14, C-in-C's Conference at GHQ Middle East, 1-4 Dec 1940, Messages, MIDEAST to TROOPERS, 2 December 1940.
57 . DOD Archives, WD, Box 284, File Operational History of 1 S.A. Div., Report on Ops El Yibo-El Sardu.
58 . Norton and Krige, Vanguard of Victory, pp 15-16.
59 . Masondo Reference Library, East Africa Photo Collection, 26.
60 . DOD Archives, WD, Box 215, File E.A. 25, No. 2 Armoured Car Company War Diary from 1/1/41 to 31/1/41; Klein, Springboks in Armour, p 38.
61 . DOD Archives, UWH, Civil, Box 120, File NAREP EA 2, East African Campaign, S.A.T.C. in Action, Lt Col. G.K. Roodt, "How Abyssinia Was Won"; WD, Box 284, File 1 SA Div. 1(S.A.) DIV. Report on Operations in Kenya and Abyssinia, December 1940 to April 1941.
62 . Kleynhans, "The South African Offensive Operations in Southern Abyssinia", pp 4956.
63 . DOD Archives, WD, Box 283, File A, 2 S.A. Inf Bde Mega-Moyale, Report on Operations Mega 14-18 February 1941; Klein, Springboks in Armour, pp 71-73.
64 . Kleynhans, "The South African Offensive Operations in Southern Abyssinia", pp 61-64.
65 . DOD Archives, WD, Box 299, File East Africa Force, Report on Operations from 1st November 1940 to 5th April 1941.
66 . DOD Archives, WD, Box 300, File 12 AFR DIV, Extracts from War Diaries, Extract from Appendices to 12 (A), Div War Diary for February 1941, Letter Godwin-Austen to Pienaar, 6 February 1941.
67 . Masondo Reference Library, East Africa Photo Collection, 551.
68 . DOD Archives, UWH Civil, Box 122, File NarepEA4, 1st SA Inf Bde Narrative of Jubaland and Giuba River Operations, 1-28 February 1941; Stewart, First Victory, p 131.
69 . DOD Archives, WD, Box 300, File 11 AFR DIV, Report Operations 14 February-April 1941, Report on Operations of 11th African Div., 14 February 6 April 1941, during which it advanced from the River Tana area to Addis Ababa, 13 July 1941.
70 . Kleynhans, "Armoured Warfare", pp 82-94; Stewart, First Victory, pp 143, 234-235.
71 . DOD Archives, CGS, Group 2, Box 92, File 160/2, Military Intelligence Appreciations (General), Data on Italian Forces in I.E.A.; DOD Archives, CGS, Group 2, Box 92, File 160/2, Military Intelligence Appreciations (General), Banda, 17 July 1940.
72 . DOD Archives, Diverse, Group 1, Box 16, File 23, Security of East and Southern Africa, "An appreciation of the situation from the point of view of the Chief of the General Staff of information to the Minister of Defence, December 1939 to March 1940.
73 . DOD Archives, Deputy Chief of Staff to Chief of the General Staff (DCS - CGS), Box 44, File UDF/132G, "Lessons Learnt in East African Campaign", 6 January 1942.
74 . Stewart, First Victory, p 143.
75 . DOD Archives, Photographic Collection, 831001086.
76 . Birkby, Uncle George, p 118.
77 . Stewart, First Victory, p 146.
78 . Hartshorn, Avenge Tobruk, pp 47-49,
79 . DOD Archives, UWH Civil, Box 120, File NAREP EA 2, East African Campaign S.A.T.C. in Action Lt Col G.K. Roodt, "How Abyssinia was Won".
80 . DOD Archives, DCS - CGS, Box 44, File UDF/132G, "Lessons Learnt in East African Campaign", 6 January 1942.
81 . Stewart, First Victory, p 136.
82 . Kleynhans, "Armoured Warfare", pp 82-94, 146-148.
83 . DOD Archives, UWH Civil, Box 120, File East African Campaigns, 2 SA Armd Car Coy 4 January 1940-30 April 1941; Orpen, East Africa and Abyssinian Campaigns, pp 138145; Birkby, Uncle George, pp 140-141.
84 . Kleynhans, "Armoured Warfare", pp 177-179.
85 . DOD Archives, UWH Civil, Box 120, File NAREP EA 2, East African Campaign S.A.T.C. in Action, Roodt, "How Abyssinia was Won".
86 . Stewart, First Victory, p xii.
87 . Orpen and Martin, Salute the Sappers, Part 1, pp 33-36, 40, 50-54.
88 . Visser and Nyanchaga, "The SA Engineer Corps's Water Supply", pp 32-37.
89 . Kleynhans, "Armoured Warfare", p 177.
90 . Masondo Reference Library, East Africa Photo Collection, 541.
91 . Stewart, First Victory, pp 141, 211.
92 . Masondo Reference Library, East Africa Photo Collection, 754.
93 . DOD Archives, CGS, Group 2, Box 92, File 160/2 Military Intelligence Appreciations (General), Northern and Eastern Frontiers of Kenya: Terrain and Rainfall, 19 June 1940.
94 . Stewart, First Victory, p xii.
95 . Bentz, "Fighting Springboks", pp 34-37; DOD Archives, WD, Box 216, File O/M 71.9/15(3) No. 1 Light Tank Coy, 1st Bn SATC, War Diary for Period August 1940.
96 . DOD Archives, CGS, Group 2, Box 92, File 160/2 Military Intelligence Appreciations (General), Northern and Eastern Frontiers of Kenya: Terrain and Rainfall, 19 June 1940; Orpen and Martin, Salute the Sappers, Part 1, pp 33-36, 40.
97 . Masondo Reference Library, East Africa Photo Collection, 540.
98 . Visser and Nyanchaga, "SA Engineer Corps's Water Supply Operations", pp 32-37.
99 . Klein, Springboks in Armour, pp 27-30; DOD Archives, WD, Box 299, File, East Africa Force, Report on Operations from 1 November 1940 to 5 April 1941.
100 . DOD Archives, WD, Box 291, File B "I" in EA Force, Fortnightly Review of the Military Situation East Africa Force, 15 July 1941; WD, Box 298, File B, Ops Record, May 1941.

