


Services on Demand
Article
 English (pdf)
 Article in xml format
 Article references
Indicators

Related links
-
 Cited by Google
 -
 Similars in Google
Share

 Permalink
South African Dental Journal
On-line version ISSN 0375-1562
Print version ISSN 0011-8516
S. Afr. dent. j. vol.75 n.3 Johannesburg Apr. 2020
http://dx.doi.org/10.17159/2519-0105/2020/v75no3a3
CLINICAL REVIEW
Mandibular first and second premolars with challenging root canal anatomy - Part 2: Endodontic management
PJ Van der VyverI; CH JonkerII; M VorsterIII
IBChD, PG Dip Dent (Endo), PG Dip Dent (Aesthet Dent), MSc, PhD (Pret), Department of Odontology, School of Dentistry, University of Pretoria, Pretoria, South Africa. ORCID Number: 0000-0003-1951-6042
IIBChD (Pret), Dip Odont (Endo), MSc (Pret), Division of Endodontics, Department of Operative Dentistry, Sefako Magatho Health Sciences University, Ga-Rankuwa, South Africa. ORCID Number: 0000-0002-9110-5208
IIIBChD, PG Dip Dent (Endo), MSc (Pret), Department of Odontology, School of Dentistry, University of Pretoria, Pretoria, South Africa. ORCID Number: 0000-0003-4470-1530
INTRODUCTION (Part 2)
In Part 1 of this article the authors give a literature review focussed on the complexity and variation in the anatomy of mandibular premolars. In Part 2 of this series the authors, by means of clinical case studies, will illustrate, discuss and give recommendations on diagnostic as well as endodontic clinical management of these, often complexed cases.
CASE REPORT 1
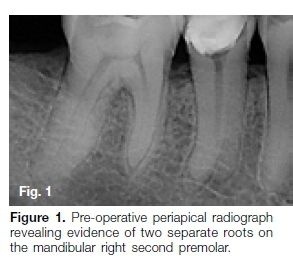
A 22-year-old, male patient presented with an uncomplicated medical history and reported no health problems. A pre-operative radiograph was taken and revealed a lower second premolar with two distinct roots (Figure 1).
After informed consent was obtained, the tooth was anaesthetised and the temporary restoration was removed. A rubber dam was applied and straight-line access (SLA) was achieved. The Dental Operating Microscope (DOM) (Zeiss Germany) was used to identify the pulpal floor map and visualise two distinct root canal orifices.
The orifices were gently enlarged using the ProTaper SX file (Dentsply Sirona, Ballaigues, Switzerland). Length determination was done using an apex locator (ProPex II, Dentsply Sirona) and size 10 K-File (Dentsply Sirona). A reproducible micro-glide path was created for a size 10 K-File and a macro-glide path was completed using the ProGlider (Dentsply Sirona). Both root canals were prepared with the WaveOne Gold Primary file (Dentsply Sirona) using the manufacturer's advocated technique.
Regular irrigation was done using 3.5% sodium hypo-chlorite activated with the EndoActivator (Dentsply Sirona). Patency was maintained during cleaning and shaping, and recapitulation and re-irrigation were done to remove debris. Once cleaning and shaping were completed, the canals were dried with appropriate paper points.
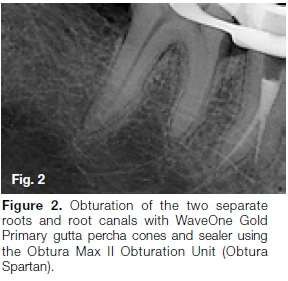
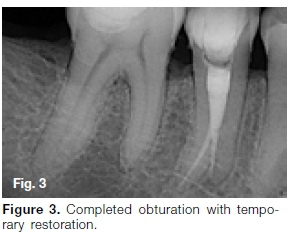
A combination of WaveOne Gold Primary gutta percha cones (Dentsply Sirona), BioRoot RCS sealer (SeptoDont, Lancaster, USA) and warm vertical condensation Obtura Max II (Obtura Spartan) was used (Figure 2 and Figure 3). Post-operative instructions were provided and the patient was rescheduled for crown preparation as final restoration to ensure cusp protection.
CASE REPORT 2
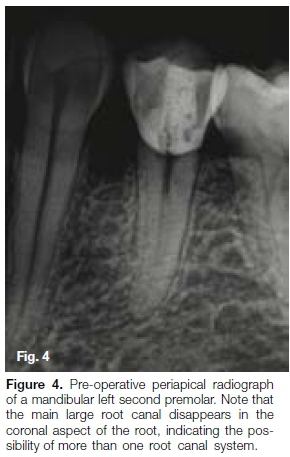
The patient, a 40-year-old male, presented with a history of an emergency root canal treatment after irreversible pulpitis on his mandibular left second premolar. A pre-operative radiograph revealed a large root canal in the coronal aspect of the tooth that suddenly disappeared in the midroot area (Figure 4).
The tooth was anaesthetised, a rubber dam was placed and the temporary filling removed from the access cavity. A pre-curved, size 08 K-File (Dentsply Sirona) was introduced into the first root canal system. An attempt was made to locate a second root canal, without any success. The access cavity was modified in a buccal-lingual direction using a Start-X tip no. 1 (Dentsply Sirona).
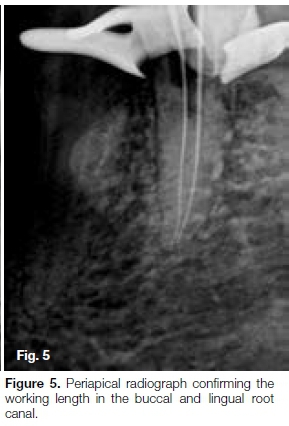
Under high magnification and LED illumination using the DOM (Global, USA) a second canal orifice was located on the buccal aspect of the root using a size 10, 4% tapered Micro-opener (Dentsply Sirona). Both canals were negotiated to working length using the size 08 C+ and K-files (Dentsply Sirona), and length determination was done with an electronic apex locator (Propex Pixie, Dentsply Sirona) and confirmed radiographically (Figure 5).
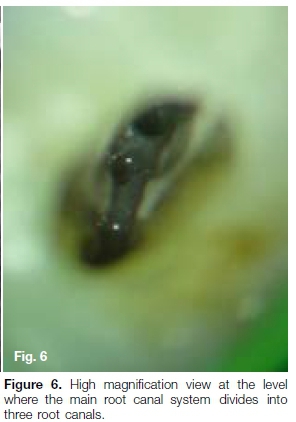
On closer inspection of the canal orifices under the DOM, it was noted that there was evidence of another possible orifice towards the buccal aspect of the located buccal root canal. The access was modified with a Start-X tip no. 2 (Dentsply Sirona) and the Microopener was used to locate the third root canal orifice (Figure 6). It was noted that the 2 buccal canals join at the junction of the midroot and apical third of the root.
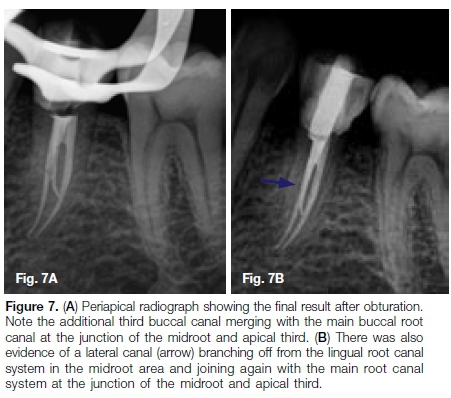
A reproducible glide path was prepared using a size 10 K-File before the glide path was enlarged with a WaveOne Gold Glider (Dentsply Sirona). The three root canals were prepared with a Primary WaveOne Gold file and irrigated with 3.5% sodium hypochlorite and 17% EDTA to remove the smear layer. A cone fit radiograph was taken and thereafter the canals were obturated using Pulp Canal Sealer (Kerr), Calamus Dual Obturation system (Dentsply Sirona) and the continuous wave of condensation obturation technique. Figure 7 shows the immediate post-operative result after obturation.
DISCUSSION
Because of the complex and variable root canal morphology, endodontic treatment of mandibular premolars can be a challenging task. Several authors have recommended careful examination of pre-operative radiographs to identify the possibility of additional root canals.1-3 Parallel and pre-operative radiographs taken from either 30° mesial or 30° distal are an important starting point.4 The following criteria can be used for examination of the pre-operative radiographs:2
1. The clinician should carefully trace the exterior and interior outlines of the tooth in the radiograph with magnification when the pre-operative radiograph is on film. With digital radiographs it is possible to magnify, emboss, colourise or invert the digital image. Hülsmann5 recommends looking for intersecting lines that might indicate additional roots or root canals when examining the outlines of the tooth.
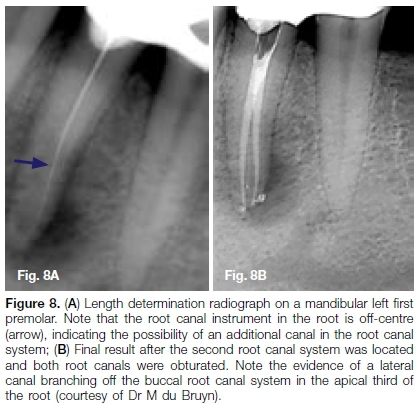
2. If a root canal instrument demonstrates an eccentric direction on deeper penetration into the root canal (directional control) (Figures 8A and B), additional root canals should be suspected.6
3. If a sudden narrowing or even disappearing pulpal space is detected on the radiograph the clinician can expect that the canal diverges at that point into 2 parts that may either remain separate or merge before reaching the apex.7
4. If the midroot image diameter appears equal to or greater than the crown image diameter, a variation in root canal morphology can be expected.8
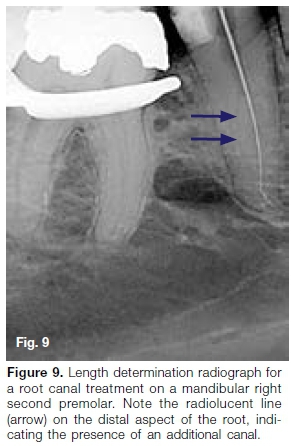
5. If a radiolucent line is detected either mesial or distal from the main root canal, the presence of an additional canal should be suspected (Figure 9).1
Cone-beam computed tomography (CBCT) can also be used as a diagnostic imaging modality for effective evaluation of root canal morphology.9,10 Matherne et al.11 show that CBCT images result in the identification of a greater number of root canal systems in teeth than does conventional radiography.
The study also concludes that the combination of CBCT scanning and the dental operating microscope was important in locating and identifying root canals. Figure 10 illustrates the important information that was obtained pre-operatively from a midroot axial slice of a CBCT scan of a mandibular right first premolar.
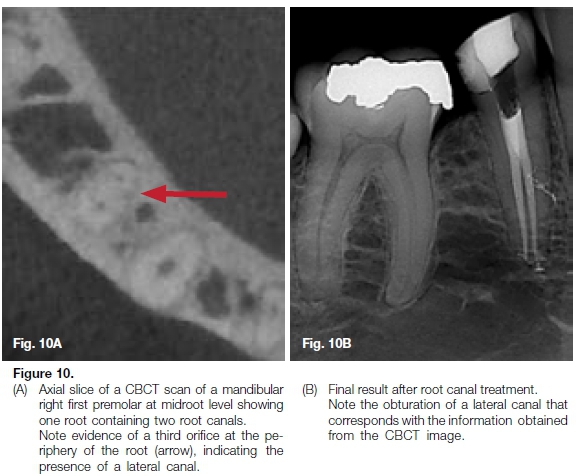
The scan reveals that the premolar presented with one root containing two root canals; there is also evidence of a third orifice at the periphery of the root, indicating the presence of a lateral canal.
The Kodak 9000 3D system generates 3D images that provide clinicians with anatomical detail and diagnostic possibilities in the field of endodontics, implantology and oral maxillofacial surgery, periodontics, general dentistry, forensic dentistry and orthodontics. The application of CBCT technology in endodontics is not limited to determining root canal morphology and the number of roots, canals and accessory canals. It can also be used to establish the correct working length, assess existing root canal fillings, determine the exact position and angulation of fractured instruments and detect the presence and extent of inflammatory root resorption, just to mention a few.12
One of the major challenges of treating mandibular premolars with multiple root canals is locating additional canal orifices. Examination of the pulp chamber and pulp chamber floor under high magnification and bright illumination can provide the clinician with valuable information. Figure 11 is a high-magnification view of the inside of a premolar root canal 16mm from the cusp tip of the tooth. Adequate illumination down the root canal system allowed the clinician to observe the orifice of the main root canal (blue arrow) as well as the orifice of an additional root canal (red arrow).
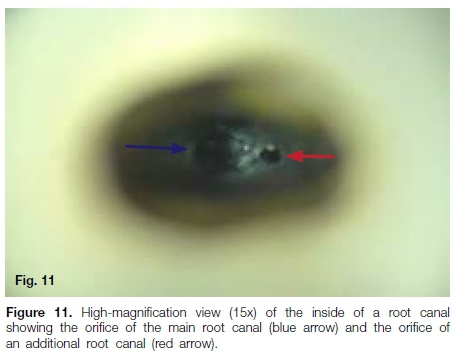
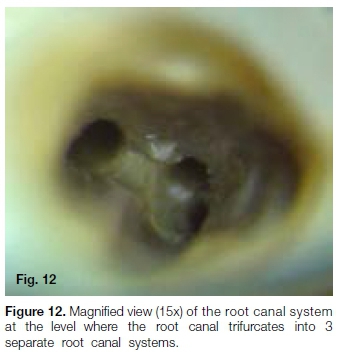
Figure 12 is a high-magnification view of the inside of a premolar root canal 18mm from the cusp tip. LED illumination in combination with a high magnification view of the root canal system allowed the clinician to locate and negotiate three separate root canal systems.
Al Fouzan13 recommends that if the pulp chamber appears to deviate from the normal expected configuration, if it seems very wide in a mesiodistal plane or if it appears to be triangular in shape, more than one root canal should be expected. If the clinician locates only one eccentric orifice, then the opposite side of the pulp chamber should be inspected for an additional root canal.14
Rödig and Hülsmann2 also suggest that a third root canal in mandibular second premolars should be suspected when the pulp chamber does not appear to be aligned in its expected buccal-lingual relationship. In addition, they point out that lines on the pulp chamber floor, which are visible during examination with magnification and illumination, can give valuable clues about where to locate additional root canals.
In the author's experience, the level at which the root canals bifurcate or trifurcate determines the level of difficulty when treating complex lower premolars (Figure 13).
The deeper the level of bifurcation, the more difficult the case and the higher the demand for adequate llumination of the dentine walls in that part of the main root canal system. This is often necessary for location and negotiation in cases where the additional canal orifices branch off from the dentine walls of the main root canal system. Conventional halogen and metal halide illumination systems on dental operating microscopes (DOM) often do not provide sufficient illumination of the deep part of the main root canal system to see enough detail to facilitate identification and location of additional canal orifices.
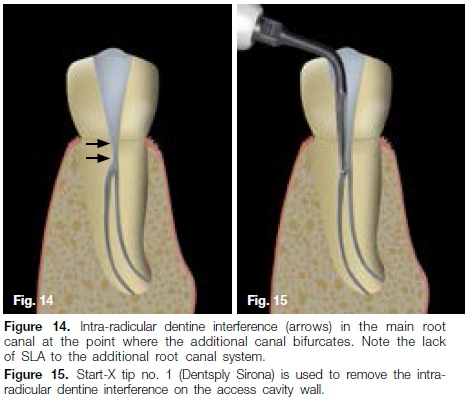
Another clinical challenge when treating mandibular second premolars with multiple root canals is creating SLA in order to negotiate all the root canals to the full root length. There are often intra-radicular dentine interferences present in the main root canal at the point where the additional canal bifurcates from the main canal (Figure 14), and because of the lack of SLA, it is very difficult to negotiate these additional canals to the radiographic terminus.
The first step in facilitating location and negotiation of these restricted canals is preparing the coronal part of the root canal. The authors prefer to do the initial pre-flaring of the coronal portion of the root canal with an SX file (Dentsply Sirona) (cutting on outward strokes only).
The preparing of the coronal portion of the root canal is a very important step that enables the clinician to visualise more detail of the pulpal floor at the point where the canals bifurcate or trifurcate under illumination and magnification. Using ultrasonic instruments to obtain clean and refined access cavity walls generally follows this step. The first instrument of choice is the Start-X no. 1 (Dentsply Sirona) (Figure 15).
This is a large ultrasonic tip (maximum diameter of 1.6mm tapering to 0.8mm) that is used to refine the coronal area in a specific direction or to remove dentine interferences on the access cavity walls that prevent direct access to the pulpal floor at the level of canal bifurcation.
After removal of the intra-radicular dentine interference, it is much easier to locate additional canal orifices due to the SLA and improved visibility of the deeper part of the root canal system (Figure 16).
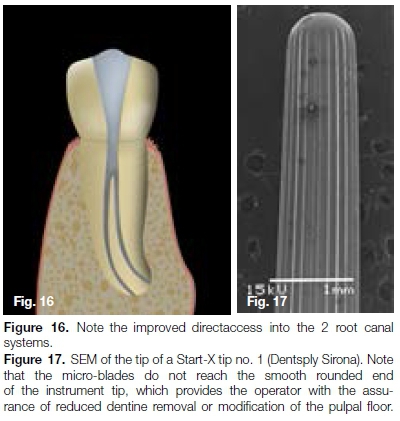
Cutting dentine with the Start-X tip no. 1 is achieved by activating the 12mm micro-blades on the instrument with an ultrasonic scaler. It is important to note that the micro-blades do not reach the smooth rounded end of the instrument tip (Figure 17), which provides the operator with the assurance of reduced dentine removal or modification of the pulpal floor. The secondary dentine on the canal wall is generally whitish or opaque compared to the darker, grey colour of the pulpal floor.15
If the additional canal in a root canal system bifurcates from the main root canal system at an acute angle (Figure 18), it is even more difficult to locate the orifice of that canal.
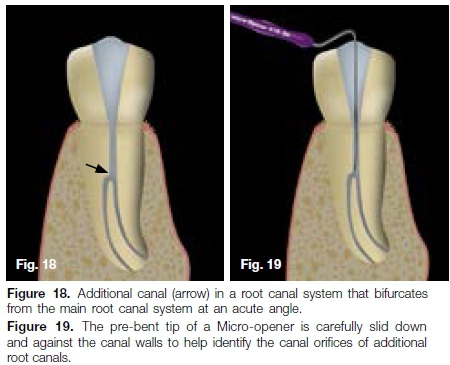
The pre-bent tip of a Micro-opener can be used to facilitate canal negotiation in these situations. The tip of the Micro-opener can be slid down and against the canal walls in order to locate additional canal orifices (Figure 19). Micro-openers are stainless steel instruments with 7mm cutting flutes that combine the canal-finding capabilities of an explorer with the instrument capabilities of a K-File.
They are available in sizes 10 and 15 with 0.4 and 0.6 tapers. The exaggerated tapers enhance the instrument's tensile strength, making it the ideal tool to locate and penetrate undiscovered canal orifices.
Although the Micro-opener will help with the identification of the entrances of additional canals, it is often not possible to enter the canal with a conventional root canal instrument due to the acute angle of entrance. In these cases the author recommends using a Start-X tip no. 2 (Dentsply Sirona) to remove a small amount of dentine from the canal wall, directly above the entrance of the canal (Figure 20), to allow more SLA into the root canal system (Figure 21). It is mandatory to do this under magnification and illumination.
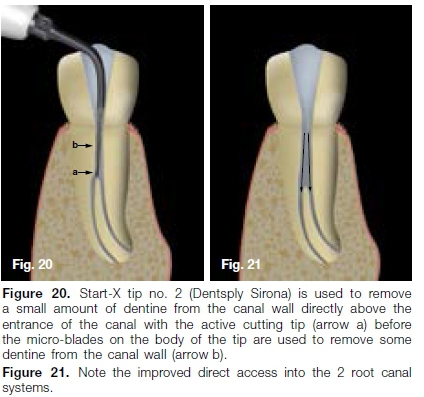
The Start-X tip no. 2 has a diameter of 1mm at the tip and a maximum diameter of 1.54mm at the end of the 8 mm cutting blades. The micro-blades extend to the rounded tip (Figure 22) to increase cutting efficiency, making this the ideal ultrasonic instrument for this task.
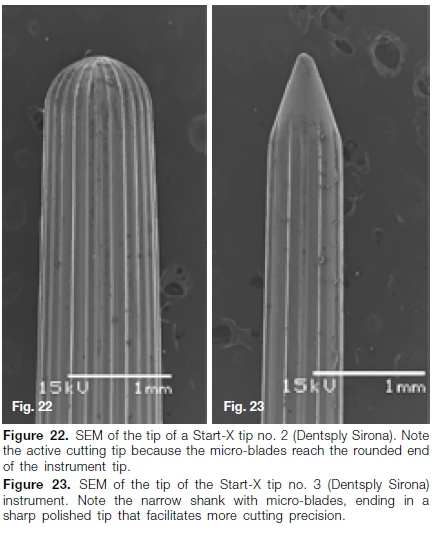
According to Buchanan,16 smaller and longer tips should be used to locate canal orifices, especially when working at depths past the middle third of the root canal length. For this task, the author recommends the Start-X tip no. 3 (Dentsply Sirona). This instrument is characterised by 8 mm micro-blades on a tip with a maximum diameter of 0.9mm, tapering to 0.64 mm, ending in a sharp polished tip (Figure 23).
Using a thinner ultrasonic tip facilitates more cutting precision and vision when removing secondary dentine or calcifications. The correct setting on the ultrasonic unit is important when the clinician searches for canal orifices inside a root canal, because aggressive cutting may cause undesired modification of the pulp chamber anatomy or perforation.15
According to Clark,17 the best results are obtained when ultrasonic tips are used with a light brush-touch motion, medium power and under magnification and illumination. The tip should only be activated when it is in contact with the dentine or calcification that the operator wants to remove.18
The final impediment when treating mandibular premolars with multiple canals is obturation of the prepared root canal systems. A few clinical problems can be encountered during this treatment phase. As mentioned before, the level at which the root canal orifices are located can vary from coronal to mid-root or the apical region of the root.
The more apical the bifurcation, the more difficult it is to obturate the root canal system. Secondly, the visibility at the point of root canal bifurcation is often limited. The more apical the bifurcation, the more challenging the obturation becomes, and generally these situations require higher magnification and brighter illumination of the pulp chamber floor.
Lastly, the size of the main root canal coronal to the bifurcation is often not large enough to accommodate two or more tapered gutta percha cones (Figure 24) to check radiographically that the cones fit.
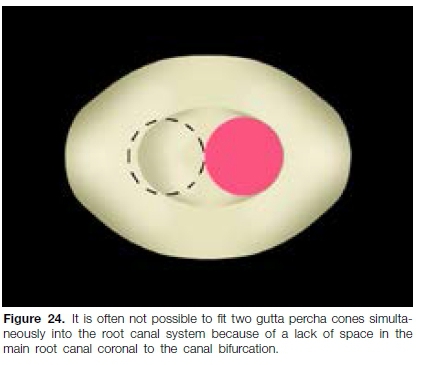
To overcome this clinical problem, one gutta percha cone at a time must be fitted and checked radiographically. In the authors' experience, the best clinical control is achieved with the continuous wave of condensation technique using the Calamus Dual Obturation system (Dentsply Sirona) to obturate multiple canals in mandi-bular premolars.
With the continuous wave of condensation technique, the down-pack handpiece of the Calamus Dual can be used to cut off one gutta percha cone at a time at orifice level. After all the cones have been placed, the down-pack handpiece can be used to soften and condense the gutta percha in each root canal. The backfill handpiece is then ideal to backfill the root canals and the coronal portion of the main root canal system with pre-heated gutta percha.
References
1. Slowey R. Root canal anatomy: road map to successful endodontics. Dent Clin North Am. 1979; 23: 555-73. [ Links ]
2. Rodig T, Hulsmann M. Diagnosis and root canal treatment of a mandibular second premolar with three root canals. Int Endod J. 2003; 36(12): 912-9. [ Links ]
3. Weine FS. Case report: three canals in the mesial root of a mandibular first molar(?). J Endod. 1982; 8(11):517-20. [ Links ]
4. Walton RE. Endodontic radiographic technics. Dental radiography and photography. 1973; 46(3): 51-9. [ Links ]
5. Hülsmann M. Mandibular first premolar with three root canals. Dental Traumatology. 1990; 6(4): 189-91. [ Links ]
6. Green D. Double canals in single roots. Oral surg, oral med, oral pathol. 1973; 35(5): 689-96. [ Links ]
7. Vertucci FJ. Root canal morphology of mandibular premolars. J Ame Dent Assoc. 1978; 97(1): 47- 50. [ Links ]
8. Nakata T. Bifurcated root canals and crown diameter. J Dent Res. 1977; 56: 1425. [ Links ]
9. Patel S, Dawood A, Ford TP, Whaites E. The potential applications of cone beam computed tomography in the management of endodontic problems. Int Endod J. 2007; 40(10): 818-30. [ Links ]
10. Kottoor J, Velmurugan N, Sudha R, Hemamalathi S. Maxillary first molar with seven root canals diagnosed with cone-beam computed tomography scanning: a case report. J Endod. 2010; 36(5): 915-21. [ Links ]
11. Matherne RP, Angelopoulos C, Kulild JC, Tira D. Use of cone-beam computed tomography to identify root canal systems in vitro. J Endod. 2008; 34(1): 87-9. [ Links ]
12. Alamri HM, Sadrameli M, Alshalhoob MA, Sadrameli M, Alshehri MA. Applications of CBCT in dental practice: a review of the literature. Gen Dent. 2012; 60(5): 390-400; quiz 401-92. [ Links ]
13. Al-Fouzan KS. The microscopic diagnosis and treatment of a mandibular second premolar with four canals. Int Endod J. 2001; 34(5): 406-10. [ Links ]
14. Vertucci FJ, Gegauff A. Root canal morphology of the maxillary first premolar. J Am Dent Assoc. 1979; 99(2): 194-8. [ Links ]
15. Plotino G, Pameijer CH, Grande NM, Somma F. Ultrasonics in endodontics: a review of the literature. J Endod. 2007; 33(2): 81-95. [ Links ]
16. Buchanan LS. Innovations in endodontic instruments and techniques: how they simplify treatment. Dent Today. 2002; 21(12): 52-4, 56-61. [ Links ]
17. Clark D. The operating microscope and ultrasonics; a perfect marriage. Dent Today. 2004; 23(6): 74-6, 78-81. [ Links ]
18. Cantatore G, Berutti E, Castellucci A. Missed anatomy: frequency and clinical impact. Endod Topics. 2006; 15(1): 3-31. [ Links ]
 Correspondence:
Peet J van der Vyver
Postal address: PO Box 2609, Cresta, 2118, South Africa.
Tel. no.: +27 (0)11 781 1020 Fax no.: +27 (0)11 781 1392
Email: peetv@iafrica.com
Author contributions:
1 . Peet J van der Vyver: Scientific writing and editing - 40%
2 . Casper H Jonker: Scientific writing and editing - 30%
3 . Martin Vorster: Scientific writing and editing - 30%

